Sweet Potato

Categories
Blog

Democratizing Development: Building Smarter, Faster with Salesforce’s Low-Code/No-Code Solutions

Introduction:

         Low-code/no-code platforms enable users to create software applications using visual interfaces instead of traditional coding. In salesforce, tools like Lightning App Builder and Flow Builder allow users to drag-and-drop elements, define workflows, and automate processes with minimal coding. This approach democratizes development, enabling business users and citizen developers to quickly prototype and deploy applications. By reducing reliance on specialized developers, organizations can accelerate digital transformation, respond faster to market changes, and efficiently customize Salesforce to meet specific needs. This blog will explore the benefits, tools, use cases, and best practices of low-code/no-code development in Salesforce.

Benefits of Low-Code/No-Code:

Accessibility to Non-Technical Users:

  • Empowerment: Low-code/no-code platforms such as Salesforce Lightning App Builder, Process Builder, and Flow Builder enable business users and administrators to create applications without deep technical expertise.
  • Ease of Use: Visual interfaces with drag-and-drop functionalities make it intuitive to build and customize apps, reducing reliance on traditional coding.

Speed of Application Development:

  • Rapid Prototyping: Users can quickly prototype and iterate applications, accelerating the development lifecycle.
  • Faster Deployment: With pre-built components and templates, applications can be deployed rapidly, responding promptly to business needs and market demands.

Flexibility and Customization:

  • Tailored Solutions: Allows organizations to customize applications to specific business requirements, enhancing functionality and user experience.
  • Adaptability: Easy modification and updates enable swift adjustments to changing business processes or user feedback, fostering agility.

Enhanced Collaboration:

  • Business-IT Alignment: Facilitates collaboration between business users and IT teams, aligning application development with strategic objectives.
  • Cross-Functional Teams: Encourages interdisciplinary collaboration, leveraging diverse expertise to innovate and solve complex challenges.

Scalability and Integration:

  • Scalable Solutions: Supports scalability as applications grow and evolve, accommodating increased user demands and data volume.
  • Integration Capabilities: Easily integrates with existing Salesforce solutions and external systems, ensuring seamless data flow and interoperability.

Tools for Efficient Application Development and Automation

Salesforce Lightning App Builder

  • Functionality:Lightning App Builder provides a visual, drag-and-drop interface, enabling users to easily design custom applications and pages
  • Features: Users can add standard and custom components (like charts, lists, forms) to create rich, responsive applications.
  • Use Cases: Ideal for quickly prototyping and deploying applications tailored to specific user roles or business processes.

Salesforce Flow Builder

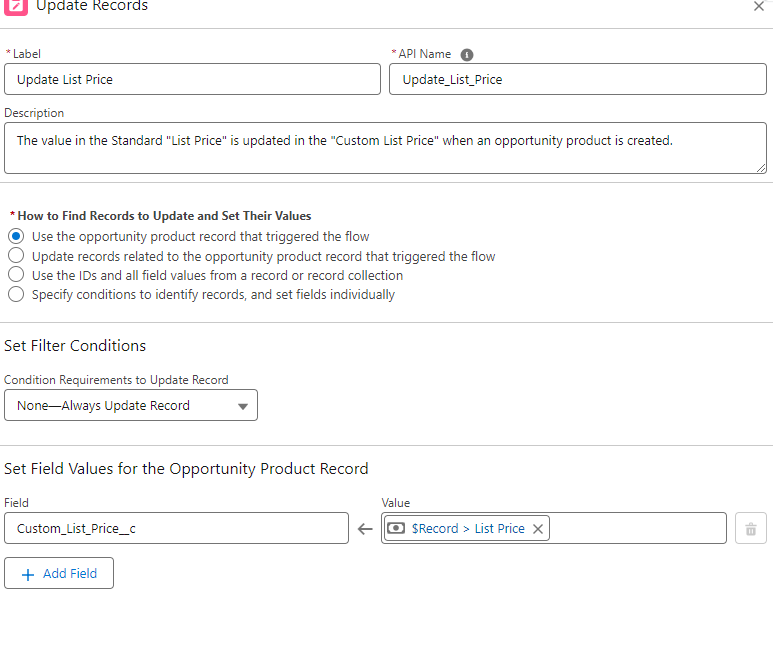
  • Functionality: Flow Builder allows users to create automated workflows (flows) for guided user interactions and data manipulation.
  • Features: Design flows to perform complex data operations, interact with users via screens and inputs, and integrate with external systems.
  • Use Cases: Automate multi-step processes like customer onboarding, service requests, and data updates across Salesforce and beyond.

Salesforce AppExchange

  • Functionality: While not a tool for development itself, the Salesforce AppExchange is a marketplace offering a wide range of pre-built applications and components.
  • Features: Users can browse and install apps and components that extend Salesforce functionality, often with configuration options that require minimal coding.
  • Use Cases: Enhance Salesforce capabilities with ready-to-use solutions for specific industries, functions (e.g., analytics, marketing automation), and integrations.

Use Cases

Custom Application Development with Lightning App Builder

  • Use Case: A sales team requires a tailored dashboard to monitor sales pipeline stages and key performance indicators (KPIs).
  • Example: Using Lightning App Builder, a sales manager can drag and drop components like charts, lists, and filters to create a dynamic dashboard. They can configure the dashboard to display real-time data from Salesforce objects such as opportunities and leads, providing actionable insights at a glance.

Creating Interactive Customer Journeys with Flow Builder

  • Use Case: A customer support team aims to improve efficiency in handling service requests by guiding users through a structured support process.
  • Example: Using Flow Builder, support agents can design a guided flow with screens for capturing customer information, selecting service types, and escalating issues as needed. The flow can integrate with Salesforce data to update case records and trigger follow-up actions, ensuring a seamless and personalized customer experience.

Extending Salesforce Functionality with AppExchange Apps

  • Use Case: A marketing team seeks to enhance campaign management capabilities within Salesforce, including advanced analytics and campaign automation.
  • Example: Marketers can discover and install apps that seamlessly integrate with Salesforce by exploring the Salesforce AppExchange. For instance, they may choose an analytics app that visualizes campaign performance metrics or a marketing automation app that automates email workflows based on customer interactions.

Best Practices for Implementing Low-Code/No-Code Solutions

  • User Training: Providing training and resources is essential to empower users to effectively utilize low-code/no-code capabilities
  • Governance and Security: Discuss best practices for maintaining governance and ensuring data security when using citizen development tools.
  • Collaboration: Encourage collaboration between business users and IT teams to align low-code/no-code solutions with overall IT strategies.

Conclusion

        Embracing low-code/no-code development in Salesforce isn’t just about simplifying application development—it’s about empowering teams to innovate, adapt, and thrive in an increasingly digital landscape. By adopting these best practices, organizations can harness the full potential of Salesforce, enabling sustainable growth and gaining a competitive advantage in the marketplace.   

Categories
Blog

How to Prevent and Clear Duplicate Data in 5 Ways in Salesforce

Maintaining clean and accurate data is crucial for any organization using Salesforce. Duplicate data can lead to inefficiencies, miscommunication, and skewed analytics. Here are five effective ways to prevent and clear duplicate data in Salesforce:

  1. Using Duplicate Management Rules
  2. Implementing Data Cleansing Tools
  3. Utilizing Flows and Custom Error Messages
  4. Regular Data Audits and Cleaning
  5. Training and User Awareness

Let’s dive into each of the methods shortly..

1. Using Duplicate Management Rules

Salesforce offers built-in tools for managing duplicates that help you prevent duplicate records during data entry.

Duplicate Rules and Matching Rules

  • Duplicate Rules: These rules alert users or block the creation of duplicate records when entering new data. For instance, you can establish a rule to detect duplicate email addresses.
  • Matching Rules: These guidelines outline the parameters for recognizing duplicate entries. You can use standard matching rules provided by Salesforce or create custom ones to suit your business needs.

Steps:

  1. Navigate to Setup.
  2. Locate “Duplicate Rules” in the Quick Find box.
  3. Create a new duplicate rule or modify an existing one.
  4. Define the matching criteria and set actions to take when a duplicate is found.

2. Implementing Data Cleansing Tools

Third-party data cleansing tools can significantly enhance your ability to identify and merge duplicate records in Salesforce.

Popular Tools

  • DemandTools – https://www.validity.com/demandtools/
  • DupeCatcher – https://dupecatcher.com/

These tools offer advanced matching algorithms, batch processing, and automated deduplication processes, making them highly effective for maintaining clean data.

Steps:

  1. Pick the data cleaning tool that suits your needs.
  2. Integrate the tool with your Salesforce instance.
  3. Configure the tool to identify and merge duplicates based on your criteria.
  4. Schedule regular cleansing sessions to keep your data clean.

3. Utilizing Flows and Custom Error Messages

Flows can help enforce data quality by preventing users from entering duplicate data.

Creating Flows & Custom Error Messages

  • Flows can be created to check for duplicate values in specific fields and prevent the user from saving the record if a duplicate is detected.
  • Providing clear error messages helps guide users in correcting data entry.

Steps:

  1. Navigate to Setup.
  2. In the quick find box click Flows. Click create a new flow.
  3. Go ahead and pick the object you want to create a flow for (like Leads or Contacts).
  4. Loop through the existing record and check the data being entered is already there..
  5. If it exists, show a custom error message to the user to prevent duplicates.

4. Regular Data Audits and Cleaning

Regular data audits can help you identify and clean up duplicate records manually.

Data Audit Reports

  • Create reports to highlight potential duplicates based on key fields like email addresses, phone numbers, or account names.
  • Periodically review these reports and manually merge or delete duplicate records.

Steps:

  1. Create custom reports to identify potential duplicates.
  2. Review the reports periodically.
  3. Use Salesforce’s merge feature to combine duplicate records.
  4. Delete unnecessary duplicate records.

5. Training and User Awareness

Educating users on the importance of data quality is essential for preventing the creation of duplicate records.

Training Sessions and Guidelines

  • Conduct training sessions to explain how to identify and avoid duplicates.
  • Develop and distribute guidelines for proper data entry and highlight common mistakes that lead to duplicates.

Steps:

  1. Organize consistent training sessions for both new and current users.
  2. Create and distribute a data entry best practices document.
  3. Monitor user compliance and provide feedback as needed.
  4. Prompt users to report any duplicate content they come across.

Conclusion

By implementing these five strategies, you can significantly reduce the occurrence of duplicate data in Salesforce. Not only does this ensure a cleaner, more reliable CRM system, but it also improves overall business efficiency and decision-making. Start with these steps today to maintain data integrity and enhance your Salesforce experience.

Categories
Blog

Maximizing Efficiency with Looping in Salesforce

In the dynamic world of Salesforce, automation is key to optimizing processes and enhancing productivity. One of the most powerful tools at your disposal is looping, which allows you to perform repetitive tasks efficiently. In this blog post, we’ll delve into the effective use of looping in Salesforce, covering use cases, best practices, and providing detailed step-by-step instructions.

Understanding Looping in Salesforce

Looping is a process where you iterate over a set of data records to perform a specific action. This can be incredibly useful in Salesforce for tasks such as updating records, creating related records, and performing complex calculations. Looping is often used in conjunction with Flow Builder, Salesforce’s powerful automation tool.

Key Use Cases for Looping

1. Batch Updating Records

One common use case for looping is batch updating records. For instance, if you need to update the status of multiple leads based on specific criteria, looping allows you to automate this process, saving time and reducing the risk of errors.

2. Creating Related Records

Looping is also useful for creating related records. For example, if you want to create multiple contact records for a single account, you can use a loop to iterate through a list of contacts and create each one automatically.

3. Performing Complex Calculations

When you need to perform calculations on a set of records, looping can be a game-changer. Whether it’s summing up values, calculating averages, or applying custom formulas, looping enables you to automate these tasks efficiently.

Step-by-Step Guide to Using Looping in Salesforce

Step 1: Define Your Criteria

Before you start building your flow, clearly define the criteria for the records you want to loop through. This might involve setting up filters or conditions to select the appropriate records.

Step 2: Create a New Flow

Navigate to Flow Builder in Salesforce and create a new flow. Choose the appropriate flow type based on your needs (e.g., Record-Triggered Flow, Scheduled Flow).

Step 3: Add a Get Records Element

Use the Get Records element to retrieve the records you need to loop through, applying necessary filters to select only those that meet your specified criteria.

Step 4: Add a Loop Element

Drag and drop a Loop element into your flow, and configure it to iterate through the collection of records retrieved by the Get Records element.

Step 5: Define Actions Within the Loop

Within the loop, define the actions you want to perform on each record. This could involve updating fields, creating related records, or performing calculations. Use Decision elements to apply conditional logic if needed.

Step 6: Test Your Flow

Before deploying your flow, thoroughly test it to ensure it works as expected. Use test data to validate the loop’s functionality and make any necessary adjustments.

Step 7: Activate Your Flow

Once you’ve tested your flow and are satisfied with its performance, activate it to start automating your processes.

Best Practices for Using Looping in Salesforce

1. Optimize for Performance

Loops can be resource-intensive, so it’s crucial to optimize your flow for performance. Avoid unnecessary operations within the loop and use efficient data structures.

2. Handle Errors Gracefully

Implement error handling within your flow to manage any issues that arise during the looping process. Use Fault Paths to catch and handle errors, ensuring your automation runs smoothly.

3. Monitor and Maintain Your Flow

Regularly monitor your flow’s performance and make adjustments as needed. Salesforce provides tools like Flow Debug and Flow Audit Trail to help you troubleshoot and optimize your flows.

Conclusion

Looping in Salesforce is a powerful technique that can significantly enhance your automation capabilities. By understanding the key use cases, following best practices, and using Flow Builder effectively, you can streamline your processes and boost productivity. Start leveraging the power of looping in Salesforce today and take your automation to the next level!

Categories
Blog

Unlocking Predictive Insights with Salesforce Einstein Prediction Builder

In the rapidly evolving world of customer relationship management (CRM), data is king. Organizations are increasingly seeking ways to harness their vast troves of customer data to make informed, strategic decisions. Enter Salesforce Einstein Prediction Builder, a powerful tool that brings the power of artificial intelligence (AI) to your fingertips, enabling businesses to predict future outcomes and drive data-driven decision-making.

What is Einstein Prediction Builder?

Einstein Prediction Builder is a user-friendly tool within the Salesforce platform that allows you to create custom AI models without needing a background in data science. It helps businesses predict key outcomes by analyzing historical data and identifying patterns and trends. Whether you want to forecast sales, predict customer churn, or identify the likelihood of a support case escalation, Einstein Prediction Builder can help you make these predictions with ease.

Key Features of Einstein Prediction Builder

No-Code AI Model Creation: One of the standout features of Einstein Prediction Builder is its no-code interface. You don’t need to be a data scientist to create powerful predictive models. With a few clicks, you can set up predictions tailored to your business needs.

Seamless Salesforce Integration: Since Einstein Prediction Builder is embedded within the Salesforce ecosystem, it integrates seamlessly with your existing Salesforce data. This ensures that your predictions are based on accurate, up-to-date information.

Customizable Predictions: You can create predictions for virtually any field or object in Salesforce. Whether it’s predicting which leads are most likely to convert or which customers are at risk of churning, the tool offers flexibility to suit various use cases.

Actionable Insights: The predictions generated by Einstein Prediction Builder are not just numbers; they provide actionable insights. You can set up workflows and automation based on these predictions to ensure timely and relevant actions are taken.

How to Begin Using Einstein Prediction Builder

Getting started with Einstein Prediction Builder is straightforward. Here’s a step-by-step guide to help you create your first prediction:

Step 1: Define Your Prediction

Identify the outcome you want to predict. This could be anything from the likelihood of a lead converting to predicting the lifetime value of a customer. For example, let’s say you want to predict the potential amount of an opportunity.

Step 2: Prepare Your Data

Ensure that your Salesforce data is clean and relevant to the prediction you want to make. The accuracy of your predictions will be directly influenced by the quality of your data.

Step 3: Create a Prediction

  1. Navigate to Einstein Prediction Builder: In Salesforce, go to the Einstein Prediction Builder setup page.
  2. Create New Prediction: Click on the “New Prediction” button.
  3. Select the Object: Choose the object you want to make predictions for (e.g., Opportunities).
  4. Define the Prediction Field: Select the field that represents the outcome you want to predict (e.g., Opportunity Amount).
  5. Choose Prediction Criteria: Set up the criteria for your prediction. This involves selecting the historical data that Einstein will analyze to generate predictions.

Step 4: Train and Evaluate Your Model

Once you’ve set up your prediction, Einstein will analyze your historical data to train the model. After the training process, you’ll receive an evaluation of the model’s accuracy. Check this to ensure the model meets your requirements.

Step 5: Deploy Your Prediction

After evaluating the model, deploy it to start generating predictions. These predictions can be used to drive workflows, automate processes, and provide insights to your team.

By following these steps, you can effectively utilize Einstein Prediction Builder to gain valuable insights and improve your Salesforce operations.

Conclusion

Einstein Prediction Builder democratizes AI, making it accessible to businesses of all sizes without the need for specialized expertise. By leveraging the power of predictive analytics, organizations can make smarter decisions, optimize their operations, and ultimately drive better business outcomes. Whether you’re looking to improve sales efficiency, enhance customer satisfaction, or streamline support processes, Einstein Prediction Builder is a game-changer in the world of CRM analytics.

Categories
Blog

Set Up Salesforce DLRS Activity Rollups

Getting Started with DLRS

1. Install DLRS: Navigate to the Salesforce AppExchange, locate the DLRS package, and install it into your Salesforce org.

2. Configure Rollup Summaries: Access the DLRS configuration page from the Setup menu. Define your rollup summaries by selecting the parent object, child object, relationship criteria, and aggregation type.

3. Monitor and Maintain: Regularly review and test your DLRS configurations to ensure they continue to meet your business requirements as data and processes evolve.

How to Set Up Salesforce DLRS Activity Rollups

DLRS is accessed via the App Launcher  

You’ll find four tabs:

Manage Lookup Rollup Summaries: Create new and update existing roll-ups.

Lookup Rollup Summary Logs: Identify errors that occur when the summaries are executed.

Lookup Rollup Summaries Tools: Use the Optimizer to access recommendations for improving the efficiency of your automation configuration.

Lookup Rollup List View:

Now that everything is really fine, you can go on the Manage Lookup Rollup Summaries tab to create a new Lookup Rollup Summary.

You find below some details on each field in order to help you during the creation.

  1. Lookup Rollup Summary Name: As the DLRS interface doesn’t group rollups by object, the list can become confusing as it grows. It’s helpful to label each rollup with the object name followed by the rollup field name.
  2. Lookup Rollup Summary Unique Name: This is the API name for your rollup. It does not auto-populate, so you will need to manually fill it in.
  3. Parent Object – The API name of the object containing the rollup field.
  4. Child Object: The API name of the object from which values are being rolled up.
  5. Relationship Field – The API name of the lookup field on the child object that relates it to the parent object.
  6. Relationship Criteria – This field is where you enter your criteria using field API names and the conditions that will be used with them. This field uses SOQL formatting so your criteria string must be formatted like that. Here’s an example of how this might look:`(IsDeleted = FALSE AND Type = ‘Call’) OR (IsDeleted = FALSE AND Type = ‘Email’)`In this scenario, the roll-up will count any undeleted Task records where the Type field value is ‘Call’ or ‘Email’.
  7. Relationship Criteria Fields – Here you only enter the API names for any of the fields used in the Relationship Criteria text box above it. Please list each unique API name on a separate line.
  1. Field to Aggregate – Specify the field you want to roll up to the parent object. For a Count operation, you can roll up the Id field of the child records.
  2. Field to Order By – Use this field when the order of child records affects the roll-up data. For example, to roll up the date of the most recent Task record, order the Tasks by Created Date or Activity Date. With the “Last” aggregate operation, the roll-up will identify the most recently created Task based on the chosen date value.
  3. Aggregate Operation – Select the type of roll-up to be created from the available options
  1. Sum
  2. Max
  3. Min
  4. Avg
  5. Count
  6. Count Distinct
  7. Concatenate
  8. Concatenate Distinct
  9. First
  10. Last

11. Aggregate All Rows – This option decides whether archived or deleted records will be included in your roll-up. For Tasks or Event records, we typically check this box to ensure archived activities are counted. To avoid counting deleted records, use the “IsDeleted = FALSE” criteria.

12. Row Limit – This sets a limit on the number of child records evaluated for your roll-up.

13. Active – This box indicates whether your roll-up is currently running or inactive. For a new DLRS on a child object, save the inactive version first, then click the “Manage Child Trigger” button to deploy the code. After that, you can save your roll-up as active to run in your org.

14. Calculation Mode – This determines how and when your roll-up should be executed.

  1. Realtime will run on any creation or update of the child object records.
  2. Scheduled allows you to set exactly when the rollup should be calculated.
  3. The developer has enabled the rollup to be invoked from custom triggers.
  4. Process Builder allows the rollup to be called from a process.

For our rollup, we will use Real Time so that the rollup will update for any new Task records added to the account, with no further configurations needed.

15. Calculation Sharing Mode – This setting determines if Salesforce sharing configurations should be considered during the roll-up calculation. “User” mode will calculate only records visible to the current user who triggered the roll-up. “System” mode will calculate all records, regardless of the current user’s access.

After filling in your DLRS with the necessary values, click the Save button. If this is your first roll-up for the child object, you cannot save the DLRS with the “Active” checkbox checked. Save it with the “Active” box unchecked.

Categories
Blog

Declarative Lookup Rollup Summaries (DLRS): Simplifying Complex Data Aggregation in Salesforce

In the dynamic world of Salesforce CRM (Customer Relationship Management), managing and analyzing data effectively is crucial for driving business success. One powerful tool that Salesforce administrators and developers often turn to is Declarative Lookup Rollup Summaries (DLRS). DLRS is a managed package on the Salesforce AppExchange that empowers users to perform complex calculations and aggregations across related records, all through point-and-click configuration rather than code.

Understanding DLRS: What It Does and How It Works

DLRS enhances Salesforce’s native functionalities by providing a straightforward method to aggregate data from child records to parent records via lookup relationships. This means that administrators can define rollup summaries—such as sums, counts, averages, or maximum/minimum values—on parent records based on the values of related child records.

Key Features and Benefits:

1. Point-and-Click Configuration: DLRS allows administrators to configure rollup summaries through the Salesforce Setup menu, making it accessible without the need for complex Apex code.

2. Flexible Aggregation: Users can define multiple rollup summaries on a single parent object, aggregating different fields and criteria as needed.

3. Real-time or Scheduled Updates: DLRS supports both real-time updates triggered by record changes and scheduled calculations, ensuring data accuracy and freshness.

4. Support for Custom Objects: It works seamlessly with both standard and custom Salesforce objects, accommodating diverse business needs.

Practical Applications in Salesforce

Sales Pipeline Management: DLRS can aggregate the total value of opportunities associated with an account, providing a comprehensive view of the sales pipeline without manual calculations.

Service Level Agreements (SLAs): Calculating average response times or resolution times across cases linked to an account or customer helps in monitoring SLA compliance.

Financial Reporting: Summarizing transaction amounts from related invoices or payments into an account or opportunity provides insights into revenue trends.

Implementation Considerations

  • Data Volume: While DLRS efficiently handles moderate data volumes, large-scale implementations may require careful consideration of performance implications and batch processing options.
  • Security and Sharing: Administrators should ensure that users have appropriate access to view and modify records involved in rollup summaries based on Salesforce sharing rules.

Conclusion

Declarative Lookup Rollup Summaries (DLRS) is a powerful tool for Salesforce administrators looking to streamline data aggregation and reporting without writing custom code. By leveraging DLRS, organizations can enhance their Salesforce CRM capabilities, gain deeper insights from their data, and drive informed decision-making across all levels of the business.

Categories
Blog

The Future of BI: What’s Next for Salesforce CRM Analytics?

In the dynamic world of customer relationship management (CRM) and business intelligence (BI), Salesforce continues to be a pivotal player, constantly evolving to meet the needs of modern businesses. As we look ahead, the future of Salesforce CRM analytics holds exciting possibilities that promise to revolutionize how organizations harness data to drive growth and enhance customer relationships.

What is CRM Analytics?

Salesforce CRM Analytics (previously called Einstein Analytics) is a cloud-based business intelligence (BI) platform integrated into the Salesforce ecosystem. It enables users to:

  • Create interactive dashboards and reports to derive insights from customer data.
  • Recognize patterns and trends in customer behavior and interactions.
  • Share insights and reports with colleagues to promote data-driven decision-making throughout the organization.

The Future of CRM Analytics

Salesforce continuously innovates and enhances the capabilities of CRM Analytics. Here are some emerging trends poised to shape the future of CRM Analytics:

Artificial Intelligence (AI) Integration

Anticipate deeper AI integration for advanced data analysis, predictive modeling, and automated insights generation.

Natural Language Processing (NLP)

Utilizing NLP capabilities will enable users to interact with CRM Analytics using natural language, making data exploration and analysis simpler.

Embedded Analytics

Anticipate seamless integration of data insights within various Salesforce functionalities, offering real-time decision-making support.

Integration of AI and Machine Learning

One of the most anticipated advancements in Salesforce CRM analytics is the deeper integration of artificial intelligence (AI) and machine learning (ML). This integration is set to transform how businesses leverage CRM data by enabling predictive analytics for sales forecasting, customer segmentation, and personalized marketing strategies. Imagine sales teams equipped with AI-driven insights that predict customer behavior and recommend the best actions to optimize sales performance.

Enhanced Data Visualization Capabilities

Data visualization plays a crucial role in making data-driven decisions understandable and actionable. Future developments in Salesforce CRM analytics will likely focus on enhancing these capabilities even further. Expect to see more interactive dashboards, advanced charts, and real-time updates that empower users to uncover insights at a glance and drill down into data with ease.

IoT and Big Data Revolution

With the proliferation of Internet of Things (IoT) devices and the exponential growth of big data, Salesforce CRM analytics are poised to evolve accordingly. Businesses will increasingly leverage IoT-generated data for deeper insights into product usage, customer preferences, and operational efficiencies. Integrating big data technologies will enable Salesforce to handle and analyze vast datasets, providing organizations with a comprehensive view of their customers and operations.

Mobile-First Analytics

In today’s mobile-centric world, accessibility to insights on the go is crucial for sales teams and executives. Salesforce CRM analytics are expected to prioritize mobile-first strategies, delivering actionable data directly to mobile devices. This trend will enable real-time decision-making and empower field teams to stay informed and responsive while engaging with customers.

Unified Customer View Across Channels

A seamless and unified view of the customer is essential for delivering personalized experiences and fostering long-term customer loyalty. Salesforce CRM analytics will continue to enhance their capabilities in integrating data from various touchpoints and channels. This holistic view will enable businesses to understand customer journeys comprehensively and tailor interactions based on individual preferences and behaviors.

Integration with External Data Sources

To enrich CRM analytics and provide deeper insights, Salesforce will likely strengthen its integration with external data sources. This includes social media platforms, market trends, and third-party analytics tools. By tapping into these diverse data streams, businesses can gain a broader context for decision-making and better anticipate market shifts and customer needs.

Ethical and Transparent Data Practices

As data privacy and ethical considerations become increasingly important, Salesforce CRM analytics will prioritize transparent data practices. This means ensuring clear guidelines on data collection, usage, and protection to build trust with customers and comply with regulatory requirements.

Conclusion

The future of Salesforce CRM analytics holds immense promise for businesses looking to stay competitive in a data-driven world. From AI-powered predictive analytics to enhanced mobile capabilities and seamless integration with IoT and big data, the evolution of Salesforce CRM analytics is set to empower organizations with deeper insights, smarter decision-making capabilities, and more personalized customer interactions. As these innovations continue to unfold, businesses that embrace these advancements will be well-positioned to thrive in an increasingly complex and competitive marketplace.

Categories
Blog

Maintaining Opportunity Price Integrity During Product Price Updates

Client Use Case

The requirement is to ensure that when we update the price of a product, the opportunity’s price should remain unaffected. Specifically, even if the Sales Price doesn’t change, any alteration in the List Price should not influence discounts for existing orders.

The issue arises because updating the List Price in a product’s price book entry also changes the List Price in the associated opportunity product. This leads to incorrect discount calculations, as illustrated below:

“When we update the price on a product we need to make sure the opportunity doesn’t also update. Even if it doesn’t update the Sales Price, if it changes the List Price it will then impact discounts and we do not want that to happen for old orders.”

That is “When the list price in this product’s price book entry changes, the list price in the opportunity product also changes.” For example, consider the example below

List PriceSales PriceDiscounted AmountDiscount %
$ 10000$ 5000$ 500050%

Now, If you change the list price amount in the price book entry of the product to $20,000, the list price in the existing opportunity product record also changes to $20,000. This causes the discounted amount calculation to be incorrect

List PriceSales PriceDiscounted AmountDiscount %
$ 20000$ 5000$ 15000150%

How do we address this requirement:

  1. I have created a custom field called “Custom List Price” in the opportunity product.
  1. When the opportunity product is created, we update the value of the Standard List Price in the Custom List Price through a flow.
  1. We’ve updated the custom formula fields (Discounted Amount, Discount %) to incorporate a Custom List Price field instead of the Standard List Price.
  1. Next, we updated the existing record’s Standard List Price to a Custom List Price using the data loader.

5. We replaced the Standard List Price with the Custom List Price in the layout.

      Conclusion

      In conclusion, the limitation of the opportunity product’s list price being incorrectly updated when the product’s price book entry changes was effectively addressed by creating a “Custom List Price” field. By leveraging this custom field, we ensured that the calculations for Discounted Amount and Discount % remained accurate and unaffected by changes in the product’s standard list price. The solution involved updating the custom field through a flow when the opportunity product is created, modifying existing records with the data loader, and adjusting the layout to reflect the custom field instead of the standard list price. This approach successfully prevents the list price in the opportunity product from being unintentionally altered, thereby maintaining the integrity of the discount calculations for old orders.

      Categories
      Blog

      Enhancing Sales Strategies with Einstein Lead Scoring

      Introduction

      In the dynamic realm of sales, discerning and ranking the most promising leads can significantly impact the outcome, separating triumph from lost chances. Although traditional lead-scoring methods are somewhat effective, they often have limitations because they rely on static, rule-based criteria. Enter Einstein Lead Scoring, an AI-driven solution that promises to revolutionize how sales teams approach lead prioritization. In this blog, we’ll delve into what Einstein Lead Scoring is, how it works, and the benefits it offers to modern sales organizations.

      What is Einstein’s Lead Scoring?

      Einstein Lead Scoring is a feature within Salesforce’s Einstein AI suite that leverages artificial intelligence and machine learning to automatically analyze and score leads based on their likelihood to convert. Unlike traditional lead scoring systems that rely on predefined rules, Einstein Lead Scoring uses predictive analytics to evaluate a variety of factors, providing a dynamic and data-driven approach to lead prioritization.

      Enabling Einstein Lead Scoring in Salesforce is a straightforward process that can significantly enhance your sales team’s efficiency by leveraging AI to prioritize leads. Follow these steps to set up and configure Einstein Lead Scoring for your organization.

      Prerequisites

      Prior to commencing, please verify that you fulfill the subsequent prerequisites:

      1. Salesforce Edition: You must have Salesforce Enterprise, Performance, or Unlimited Edition.
      2. Einstein Features: Ensure that you have the necessary Einstein features enabled in your Salesforce instance.
      3. Data Quality: Make sure your CRM data is clean, accurate, and comprehensive, as the effectiveness of lead scoring depends on the quality of your data.

      Step 1: Enable Einstein Lead Scoring

      1. Login to Salesforce: Log in to your Salesforce account with administrative privileges.
      2. Navigate to Setup: To access the settings, click on the gear icon located in the upper right corner and choose ‘Setup’ from the dropdown menu.
      3. Search for Einstein Lead Scoring: Navigate to the Quick Find box located on the left side of the Setup page, and enter “Einstein Lead Scoring.”
      4. Enable Einstein Lead Scoring: Click on “Einstein Lead Scoring” under the “Einstein Sales” section. Click the “Get Started” button and follow the on-screen instructions to enable the feature. This may take a few moments as Salesforce prepares your data for AI analysis.

      Step 2: Configure Einstein Lead Scoring

      1. Review Data Preparation: Salesforce will analyze your data to prepare it for lead scoring. Review any notifications or recommendations provided by Salesforce to ensure your data is ready.
      1. Select Fields for Scoring: During the setup process, you will be prompted to select the fields that Einstein Lead Scoring will use to evaluate and score leads. This typically includes fields like lead source, industry, company size, and interaction history. Ensure you select relevant fields that are likely to influence lead conversion.
      1. Adjust Scoring Settings: Customize the scoring settings to align with your business requirements. You can prioritize certain attributes over others based on your sales strategy.

      Step 3: Deploy Einstein Lead Scoring

      1. Activate Scoring: Once you have configured the settings, activate lead scoring. Salesforce will begin analyzing your historical data to build the predictive model.
      2. Score Leads: After activation, Salesforce will automatically score new and existing leads. You can view the lead scores in the Lead object. Each lead will have a score and an explanation of why it received that score, helping your sales team understand the AI’s rationale.

      Step 4: Utilize Lead Scoring in Your Sales Process

      1. Train Your Sales Team: Ensure your sales team understands how to interpret and use lead scores. Provide training sessions to explain how the scores are generated and how they should be used to prioritize leads.
      2. Customize Lead Views: Customize your lead views and reports to include the Einstein lead score. This will help your sales team easily identify and focus on high-priority leads.
      1. Monitor and Refine: Regularly review the performance of Einstein Lead Scoring. Monitor lead conversion rates and gather feedback from your sales team to make any necessary adjustments. The AI model will continue to learn and improve over time as more data is collected.

      Step 5: Optimize and Scale

      1. Integrate with Marketing: Collaborate with your marketing team to align lead generation efforts with lead scoring insights. This can help improve the quality of leads being passed to the sales team.
      2. Expand Usage: Consider expanding the use of Einstein Lead Scoring to other areas of your organization, such as account scoring for account-based marketing (ABM) strategies.
      3. Leverage Insights: Use the insights provided by Einstein Lead Scoring to refine your sales and marketing strategies. Identify patterns and trends that can inform future campaigns and sales tactics.

      Conclusion

      Enabling Einstein Lead Scoring in Salesforce is a powerful way to enhance your lead prioritization process using AI. By following these steps, you can set up and configure lead scoring to help your sales team focus on the most promising leads, ultimately driving higher conversion rates and sales efficiency. Regular monitoring and continuous optimization will ensure that you get the most out of this advanced AI-driven tool.

      Categories
      Blog

      Ensuring Business Continuity: Developing a Robust Data Recovery Strategy for Your Salesforce Org

      In today’s digital era, data is a crucial asset for businesses. Salesforce, being one of the leading Customer Relationship Management (CRM) platforms, houses a vast amount of critical data for organizations worldwide. Ensuring this data is protected and can be recovered in the event of a disaster is paramount. Crafting a robust data recovery plan is essential not only for compliance purposes but also for the overall resilience of your organization. In this blog, we will explore the key steps to creating an effective data recovery plan for your Salesforce org and review the backup solutions available.

      Understanding the Importance of a Data Recovery Plan

      A data recovery plan is a strategic approach that outlines the processes and technologies needed to restore data in the event of a loss. The significance of a comprehensive data recovery plan includes:

      1. Compliance: Adhering to regulatory requirements such as GDPR, HIPAA, and others mandates having a solid data recovery strategy.
      2. Business Continuity: Ensuring that your business operations can continue with minimal disruption in case of data loss.
      3. Data Integrity: Protecting the integrity and accuracy of your data.
      4. Reputation Management: Avoiding the potential damage to your company’s reputation due to data breaches or losses.

      Key Components of a Salesforce Data Recovery Plan

      1. Assessment of Current Backup Solutions
        • Evaluate existing backup mechanisms within Salesforce.
        • Identify any gaps in your current backup strategy.
        • Understand Salesforce’s native backup options and limitations.
      2. Define Recovery Objectives
        • Recovery Point Objective (RPO): Determine the maximum acceptable amount of data loss measured in time.
        • Recovery Time Objective (RTO): Define the target time you can tolerate to restore the data.
      3. Data Backup Strategies
        • Automated Backups: Use Salesforce’s native tools or third-party solutions to automate backups.
        • Full Backups: Regularly perform full backups of your Salesforce data.
        • Incremental Backups: Conduct incremental backups to capture only the changes since the last backup, saving time and storage.
      4. Data Encryption and Security
        • Ensure that your backups are encrypted to protect sensitive information.
        • Implement robust access controls to prevent unauthorized access to backup files.
      5. Regular Testing and Validation
        • Periodically test your backup and recovery processes to ensure they work as expected.
        • Validate the integrity of your backups to confirm they can be restored correctly.
      6. Documentation and Training
        • Document every step of your data recovery plan.
        • Provide training for your team to ensure they understand the recovery procedures.
      7. Continuous Improvement
        • Regularly review and update your data recovery plan to adapt to new risks and changes in your Salesforce org.
        • Stay informed about new features and tools offered by Salesforce that can enhance your data recovery strategy.

      Salesforce Native Backup Solutions

      Salesforce offers several native backup solutions, each with its own set of features and limitations:

      1. Data Export Service
        • Description: Allows you to manually export your Salesforce data on a weekly or monthly basis.
        • Features: CSV files of your data are sent to a secure location from where you can download them.
        • Limitations: Manual process; lacks automated real-time backups.
      2. Data Loader
        • Description: A client application for bulk import, export, update, or deletion of data.
        • Features: Supports scheduling and automation via command-line interface.
        • Limitations: Requires manual setup and scripting for automated processes.
      3. Salesforce Shield
        • Description: Advanced set of security and compliance tools, including Event Monitoring, Field Audit Trail, and Platform Encryption.
        • Features: Enhanced data retention and audit capabilities.
        • Limitations: Requires an additional license; primarily focused on compliance and security rather than backup and recovery.
      4. Weekly Export
        • Description: Similar to the Data Export Service but provides a weekly backup.
        • Features: Can be scheduled to run automatically.
        • Limitations: Data is exported weekly, which might not be sufficient for organizations needing more frequent backups.

      Third-Party Backup Solutions

      In addition to Salesforce’s native options, many organizations opt for third-party solutions to enhance their data recovery capabilities. These solutions often offer more comprehensive features:

      1. OwnBackup
        • Description: Comprehensive cloud-to-cloud backup and recovery solution.
        • Features: Automated daily backups, rapid restore capabilities, compliance reporting, and data comparison.
        • Benefits: Provides granular recovery options and robust compliance features.
      2. Spanning Backup for Salesforce
        • Description: Enterprise-grade backup solution for Salesforce data.
        • Features: Automated daily backups, point-in-time recovery, and easy data restores.
        • Benefits: User-friendly interface, detailed reporting, and reliable backup processes.
      3. CloudAlly
        • Description: Offers automated daily backups and data recovery for Salesforce.
        • Features: Includes backups for Salesforce data, metadata, and Chatter feeds.
        • Benefits: Secure storage, easy restoration, and compliance support.
      4. Datto Backupify for Salesforce
        • Description: Provides automated, continuous data protection.
        • Features: Includes daily automated backups, quick restore options, and secure data storage.
        • Benefits: Comprehensive protection and fast recovery times.
      5. Flosum Backup and Recovery
        • Description: Backup solution designed specifically for Salesforce environments.
        • Features: Offers daily automated backups, granular recovery options, and encryption.
        • Benefits: Seamless integration with Salesforce, strong security features.

      Conclusion

      Crafting a data recovery plan for your Salesforce org is not just about compliance; it’s about safeguarding your business’s most valuable asset—its data. By assessing your current backup solutions, defining clear recovery objectives, implementing robust backup strategies, ensuring security, regularly testing and validating your plan, and continuously improving your processes, you can build a resilient data recovery framework. Additionally, considering third-party solutions can further enhance your data protection measures. Ultimately, a well-crafted data recovery plan will provide peace of mind, knowing that your Salesforce data is secure and can be quickly restored in the event of a loss.