Sweet Potato

Categories
Uncategorized

New User Management Features in Salesforce Summer ’24 Release

In this article, we’ll discuss the importance of user management processes, highlight the built-in functionalities you can utilize, and explain how recent enhancements can improve workflow efficiency for all users.

1. General Availability of User Access Policies

User access policies have transitioned from beta to general availability, offering a powerful tool for automating user permissions and memberships. Admins can now automatically assign or remove permission sets, permission set groups, queue or group memberships, and various licenses based on specific user criteria. This can be done as a one-time action or set as an ongoing automation triggered by user creation or updates.

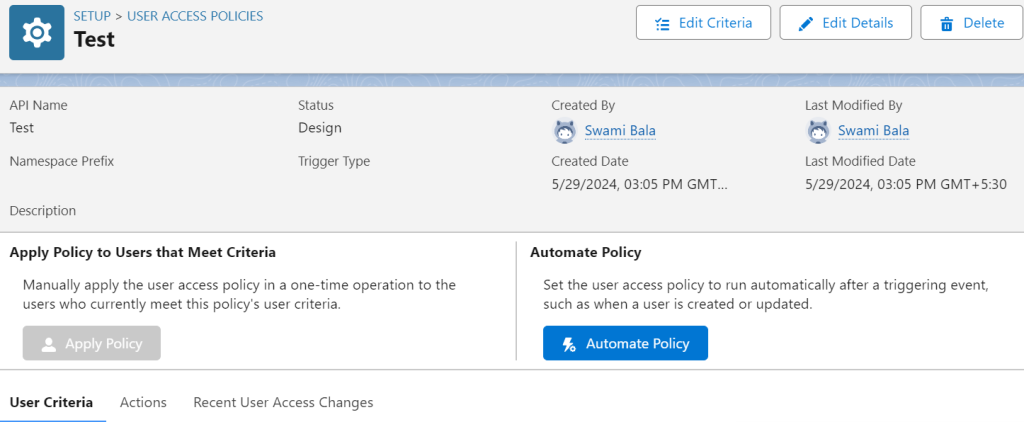
The Summer ’24 release significantly increases the number of active policies from 20 to 200, accommodating a wide range of organizational scenarios. Additionally, admins can now set the order of policies, providing more control and ensuring efficient orchestration. The access changes tab allows for easy auditing of changes made by these policies.

2.User and Public Group View Summaries

Responding to feedback from the Trailblazer Community, Salesforce introduces the View Summary button for user records, simplifying the process of checking user access. This feature consolidates object and field permissions, user permissions, public group memberships, queue memberships, and custom permissions into one accessible view.

A similar summary view is now available for public groups, displaying where each group is used within your org, including sharing rules, list views, report, and dashboard folders. This enhancement significantly reduces the time and effort required to manage user and group permissions.

3. Permission Set and Group View Summaries

The View Summary feature has now been expanded to include permission sets and permission set groups, improving user experience and navigation efficiency. Previously available in beta, this feature is now generally available in production orgs. It allows admins to swiftly access comprehensive details such as related permission set groups, object and field permissions, user permissions, and custom permissions.

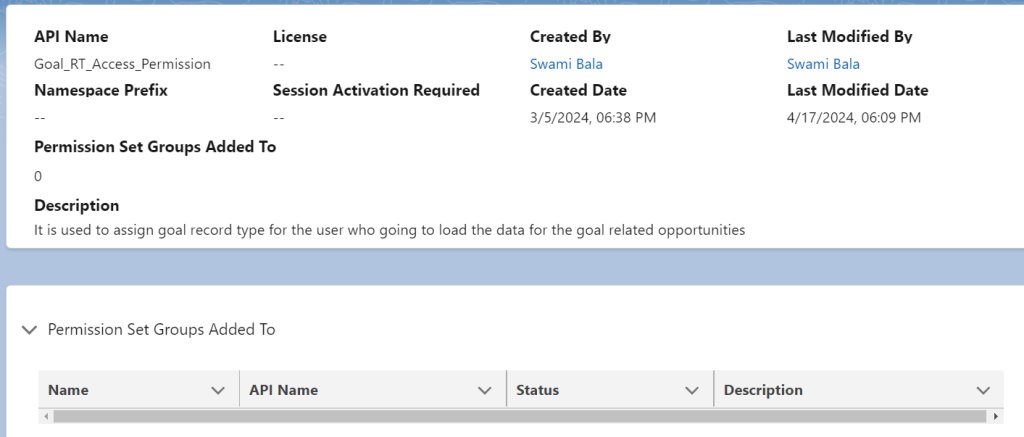
By consolidating all this information onto a single page, managing permission sets and groups becomes significantly easier and faster, eliminating the need to navigate through multiple sections.

4. New Permissions for User Management

To improve security and limit extensive permissions for non-admin users, Salesforce introduces two new user-specific permissions: Freeze Users and Monitor Login History. Previously, these actions required the Manage Users permission. With the Summer ’24 release, these capabilities are now separate, allowing for more granular control.

These new permissions are accessible in the System Permissions section of your permission sets, providing flexibility in user management without compromising security.

5. Dev Sandbox Management Permissions

The Summer ’24 release introduces a new permission specifically for managing Developer and Developer Pro sandboxes. The Manage Dev Sandboxes permission restricts sandbox manipulation capabilities, ensuring that full and partial copy sandboxes remain under the control of a limited number of admins. The traditional Manage Sandboxes permission will still be available but should be reserved for more extensive sandbox management tasks.

Conclusion

The Summer ’24 Salesforce release significantly enhances user management capabilities, providing admins with more control, efficiency, and security.

Categories
Blog

Democratizing Development: Building Smarter, Faster with Salesforce’s Low-Code/No-Code Solutions

Introduction:

         Low-code/no-code platforms enable users to create software applications using visual interfaces instead of traditional coding. In salesforce, tools like Lightning App Builder and Flow Builder allow users to drag-and-drop elements, define workflows, and automate processes with minimal coding. This approach democratizes development, enabling business users and citizen developers to quickly prototype and deploy applications. By reducing reliance on specialized developers, organizations can accelerate digital transformation, respond faster to market changes, and efficiently customize Salesforce to meet specific needs. This blog will explore the benefits, tools, use cases, and best practices of low-code/no-code development in Salesforce.

Benefits of Low-Code/No-Code:

Accessibility to Non-Technical Users:

  • Empowerment: Low-code/no-code platforms such as Salesforce Lightning App Builder, Process Builder, and Flow Builder enable business users and administrators to create applications without deep technical expertise.
  • Ease of Use: Visual interfaces with drag-and-drop functionalities make it intuitive to build and customize apps, reducing reliance on traditional coding.

Speed of Application Development:

  • Rapid Prototyping: Users can quickly prototype and iterate applications, accelerating the development lifecycle.
  • Faster Deployment: With pre-built components and templates, applications can be deployed rapidly, responding promptly to business needs and market demands.

Flexibility and Customization:

  • Tailored Solutions: Allows organizations to customize applications to specific business requirements, enhancing functionality and user experience.
  • Adaptability: Easy modification and updates enable swift adjustments to changing business processes or user feedback, fostering agility.

Enhanced Collaboration:

  • Business-IT Alignment: Facilitates collaboration between business users and IT teams, aligning application development with strategic objectives.
  • Cross-Functional Teams: Encourages interdisciplinary collaboration, leveraging diverse expertise to innovate and solve complex challenges.

Scalability and Integration:

  • Scalable Solutions: Supports scalability as applications grow and evolve, accommodating increased user demands and data volume.
  • Integration Capabilities: Easily integrates with existing Salesforce solutions and external systems, ensuring seamless data flow and interoperability.

Tools for Efficient Application Development and Automation

Salesforce Lightning App Builder

  • Functionality:Lightning App Builder provides a visual, drag-and-drop interface, enabling users to easily design custom applications and pages
  • Features: Users can add standard and custom components (like charts, lists, forms) to create rich, responsive applications.
  • Use Cases: Ideal for quickly prototyping and deploying applications tailored to specific user roles or business processes.

Salesforce Flow Builder

  • Functionality: Flow Builder allows users to create automated workflows (flows) for guided user interactions and data manipulation.
  • Features: Design flows to perform complex data operations, interact with users via screens and inputs, and integrate with external systems.
  • Use Cases: Automate multi-step processes like customer onboarding, service requests, and data updates across Salesforce and beyond.

Salesforce AppExchange

  • Functionality: While not a tool for development itself, the Salesforce AppExchange is a marketplace offering a wide range of pre-built applications and components.
  • Features: Users can browse and install apps and components that extend Salesforce functionality, often with configuration options that require minimal coding.
  • Use Cases: Enhance Salesforce capabilities with ready-to-use solutions for specific industries, functions (e.g., analytics, marketing automation), and integrations.

Use Cases

Custom Application Development with Lightning App Builder

  • Use Case: A sales team requires a tailored dashboard to monitor sales pipeline stages and key performance indicators (KPIs).
  • Example: Using Lightning App Builder, a sales manager can drag and drop components like charts, lists, and filters to create a dynamic dashboard. They can configure the dashboard to display real-time data from Salesforce objects such as opportunities and leads, providing actionable insights at a glance.

Creating Interactive Customer Journeys with Flow Builder

  • Use Case: A customer support team aims to improve efficiency in handling service requests by guiding users through a structured support process.
  • Example: Using Flow Builder, support agents can design a guided flow with screens for capturing customer information, selecting service types, and escalating issues as needed. The flow can integrate with Salesforce data to update case records and trigger follow-up actions, ensuring a seamless and personalized customer experience.

Extending Salesforce Functionality with AppExchange Apps

  • Use Case: A marketing team seeks to enhance campaign management capabilities within Salesforce, including advanced analytics and campaign automation.
  • Example: Marketers can discover and install apps that seamlessly integrate with Salesforce by exploring the Salesforce AppExchange. For instance, they may choose an analytics app that visualizes campaign performance metrics or a marketing automation app that automates email workflows based on customer interactions.

Best Practices for Implementing Low-Code/No-Code Solutions

  • User Training: Providing training and resources is essential to empower users to effectively utilize low-code/no-code capabilities
  • Governance and Security: Discuss best practices for maintaining governance and ensuring data security when using citizen development tools.
  • Collaboration: Encourage collaboration between business users and IT teams to align low-code/no-code solutions with overall IT strategies.

Conclusion

        Embracing low-code/no-code development in Salesforce isn’t just about simplifying application development—it’s about empowering teams to innovate, adapt, and thrive in an increasingly digital landscape. By adopting these best practices, organizations can harness the full potential of Salesforce, enabling sustainable growth and gaining a competitive advantage in the marketplace.   

Categories
Blog

Maximizing Efficiency with Looping in Salesforce

In the dynamic world of Salesforce, automation is key to optimizing processes and enhancing productivity. One of the most powerful tools at your disposal is looping, which allows you to perform repetitive tasks efficiently. In this blog post, we’ll delve into the effective use of looping in Salesforce, covering use cases, best practices, and providing detailed step-by-step instructions.

Understanding Looping in Salesforce

Looping is a process where you iterate over a set of data records to perform a specific action. This can be incredibly useful in Salesforce for tasks such as updating records, creating related records, and performing complex calculations. Looping is often used in conjunction with Flow Builder, Salesforce’s powerful automation tool.

Key Use Cases for Looping

1. Batch Updating Records

One common use case for looping is batch updating records. For instance, if you need to update the status of multiple leads based on specific criteria, looping allows you to automate this process, saving time and reducing the risk of errors.

2. Creating Related Records

Looping is also useful for creating related records. For example, if you want to create multiple contact records for a single account, you can use a loop to iterate through a list of contacts and create each one automatically.

3. Performing Complex Calculations

When you need to perform calculations on a set of records, looping can be a game-changer. Whether it’s summing up values, calculating averages, or applying custom formulas, looping enables you to automate these tasks efficiently.

Step-by-Step Guide to Using Looping in Salesforce

Step 1: Define Your Criteria

Before you start building your flow, clearly define the criteria for the records you want to loop through. This might involve setting up filters or conditions to select the appropriate records.

Step 2: Create a New Flow

Navigate to Flow Builder in Salesforce and create a new flow. Choose the appropriate flow type based on your needs (e.g., Record-Triggered Flow, Scheduled Flow).

Step 3: Add a Get Records Element

Use the Get Records element to retrieve the records you need to loop through, applying necessary filters to select only those that meet your specified criteria.

Step 4: Add a Loop Element

Drag and drop a Loop element into your flow, and configure it to iterate through the collection of records retrieved by the Get Records element.

Step 5: Define Actions Within the Loop

Within the loop, define the actions you want to perform on each record. This could involve updating fields, creating related records, or performing calculations. Use Decision elements to apply conditional logic if needed.

Step 6: Test Your Flow

Before deploying your flow, thoroughly test it to ensure it works as expected. Use test data to validate the loop’s functionality and make any necessary adjustments.

Step 7: Activate Your Flow

Once you’ve tested your flow and are satisfied with its performance, activate it to start automating your processes.

Best Practices for Using Looping in Salesforce

1. Optimize for Performance

Loops can be resource-intensive, so it’s crucial to optimize your flow for performance. Avoid unnecessary operations within the loop and use efficient data structures.

2. Handle Errors Gracefully

Implement error handling within your flow to manage any issues that arise during the looping process. Use Fault Paths to catch and handle errors, ensuring your automation runs smoothly.

3. Monitor and Maintain Your Flow

Regularly monitor your flow’s performance and make adjustments as needed. Salesforce provides tools like Flow Debug and Flow Audit Trail to help you troubleshoot and optimize your flows.

Conclusion

Looping in Salesforce is a powerful technique that can significantly enhance your automation capabilities. By understanding the key use cases, following best practices, and using Flow Builder effectively, you can streamline your processes and boost productivity. Start leveraging the power of looping in Salesforce today and take your automation to the next level!

Categories
Blog

Enhancing Sales Strategies with Einstein Lead Scoring

Introduction

In the dynamic realm of sales, discerning and ranking the most promising leads can significantly impact the outcome, separating triumph from lost chances. Although traditional lead-scoring methods are somewhat effective, they often have limitations because they rely on static, rule-based criteria. Enter Einstein Lead Scoring, an AI-driven solution that promises to revolutionize how sales teams approach lead prioritization. In this blog, we’ll delve into what Einstein Lead Scoring is, how it works, and the benefits it offers to modern sales organizations.

What is Einstein’s Lead Scoring?

Einstein Lead Scoring is a feature within Salesforce’s Einstein AI suite that leverages artificial intelligence and machine learning to automatically analyze and score leads based on their likelihood to convert. Unlike traditional lead scoring systems that rely on predefined rules, Einstein Lead Scoring uses predictive analytics to evaluate a variety of factors, providing a dynamic and data-driven approach to lead prioritization.

Enabling Einstein Lead Scoring in Salesforce is a straightforward process that can significantly enhance your sales team’s efficiency by leveraging AI to prioritize leads. Follow these steps to set up and configure Einstein Lead Scoring for your organization.

Prerequisites

Prior to commencing, please verify that you fulfill the subsequent prerequisites:

  1. Salesforce Edition: You must have Salesforce Enterprise, Performance, or Unlimited Edition.
  2. Einstein Features: Ensure that you have the necessary Einstein features enabled in your Salesforce instance.
  3. Data Quality: Make sure your CRM data is clean, accurate, and comprehensive, as the effectiveness of lead scoring depends on the quality of your data.

Step 1: Enable Einstein Lead Scoring

  1. Login to Salesforce: Log in to your Salesforce account with administrative privileges.
  2. Navigate to Setup: To access the settings, click on the gear icon located in the upper right corner and choose ‘Setup’ from the dropdown menu.
  3. Search for Einstein Lead Scoring: Navigate to the Quick Find box located on the left side of the Setup page, and enter “Einstein Lead Scoring.”
  4. Enable Einstein Lead Scoring: Click on “Einstein Lead Scoring” under the “Einstein Sales” section. Click the “Get Started” button and follow the on-screen instructions to enable the feature. This may take a few moments as Salesforce prepares your data for AI analysis.

Step 2: Configure Einstein Lead Scoring

  1. Review Data Preparation: Salesforce will analyze your data to prepare it for lead scoring. Review any notifications or recommendations provided by Salesforce to ensure your data is ready.
  1. Select Fields for Scoring: During the setup process, you will be prompted to select the fields that Einstein Lead Scoring will use to evaluate and score leads. This typically includes fields like lead source, industry, company size, and interaction history. Ensure you select relevant fields that are likely to influence lead conversion.
  1. Adjust Scoring Settings: Customize the scoring settings to align with your business requirements. You can prioritize certain attributes over others based on your sales strategy.

Step 3: Deploy Einstein Lead Scoring

  1. Activate Scoring: Once you have configured the settings, activate lead scoring. Salesforce will begin analyzing your historical data to build the predictive model.
  2. Score Leads: After activation, Salesforce will automatically score new and existing leads. You can view the lead scores in the Lead object. Each lead will have a score and an explanation of why it received that score, helping your sales team understand the AI’s rationale.

Step 4: Utilize Lead Scoring in Your Sales Process

  1. Train Your Sales Team: Ensure your sales team understands how to interpret and use lead scores. Provide training sessions to explain how the scores are generated and how they should be used to prioritize leads.
  2. Customize Lead Views: Customize your lead views and reports to include the Einstein lead score. This will help your sales team easily identify and focus on high-priority leads.
  1. Monitor and Refine: Regularly review the performance of Einstein Lead Scoring. Monitor lead conversion rates and gather feedback from your sales team to make any necessary adjustments. The AI model will continue to learn and improve over time as more data is collected.

Step 5: Optimize and Scale

  1. Integrate with Marketing: Collaborate with your marketing team to align lead generation efforts with lead scoring insights. This can help improve the quality of leads being passed to the sales team.
  2. Expand Usage: Consider expanding the use of Einstein Lead Scoring to other areas of your organization, such as account scoring for account-based marketing (ABM) strategies.
  3. Leverage Insights: Use the insights provided by Einstein Lead Scoring to refine your sales and marketing strategies. Identify patterns and trends that can inform future campaigns and sales tactics.

Conclusion

Enabling Einstein Lead Scoring in Salesforce is a powerful way to enhance your lead prioritization process using AI. By following these steps, you can set up and configure lead scoring to help your sales team focus on the most promising leads, ultimately driving higher conversion rates and sales efficiency. Regular monitoring and continuous optimization will ensure that you get the most out of this advanced AI-driven tool.

Categories
Blog

Ensuring Business Continuity: Developing a Robust Data Recovery Strategy for Your Salesforce Org

In today’s digital era, data is a crucial asset for businesses. Salesforce, being one of the leading Customer Relationship Management (CRM) platforms, houses a vast amount of critical data for organizations worldwide. Ensuring this data is protected and can be recovered in the event of a disaster is paramount. Crafting a robust data recovery plan is essential not only for compliance purposes but also for the overall resilience of your organization. In this blog, we will explore the key steps to creating an effective data recovery plan for your Salesforce org and review the backup solutions available.

Understanding the Importance of a Data Recovery Plan

A data recovery plan is a strategic approach that outlines the processes and technologies needed to restore data in the event of a loss. The significance of a comprehensive data recovery plan includes:

  1. Compliance: Adhering to regulatory requirements such as GDPR, HIPAA, and others mandates having a solid data recovery strategy.
  2. Business Continuity: Ensuring that your business operations can continue with minimal disruption in case of data loss.
  3. Data Integrity: Protecting the integrity and accuracy of your data.
  4. Reputation Management: Avoiding the potential damage to your company’s reputation due to data breaches or losses.

Key Components of a Salesforce Data Recovery Plan

  1. Assessment of Current Backup Solutions
    • Evaluate existing backup mechanisms within Salesforce.
    • Identify any gaps in your current backup strategy.
    • Understand Salesforce’s native backup options and limitations.
  2. Define Recovery Objectives
    • Recovery Point Objective (RPO): Determine the maximum acceptable amount of data loss measured in time.
    • Recovery Time Objective (RTO): Define the target time you can tolerate to restore the data.
  3. Data Backup Strategies
    • Automated Backups: Use Salesforce’s native tools or third-party solutions to automate backups.
    • Full Backups: Regularly perform full backups of your Salesforce data.
    • Incremental Backups: Conduct incremental backups to capture only the changes since the last backup, saving time and storage.
  4. Data Encryption and Security
    • Ensure that your backups are encrypted to protect sensitive information.
    • Implement robust access controls to prevent unauthorized access to backup files.
  5. Regular Testing and Validation
    • Periodically test your backup and recovery processes to ensure they work as expected.
    • Validate the integrity of your backups to confirm they can be restored correctly.
  6. Documentation and Training
    • Document every step of your data recovery plan.
    • Provide training for your team to ensure they understand the recovery procedures.
  7. Continuous Improvement
    • Regularly review and update your data recovery plan to adapt to new risks and changes in your Salesforce org.
    • Stay informed about new features and tools offered by Salesforce that can enhance your data recovery strategy.

Salesforce Native Backup Solutions

Salesforce offers several native backup solutions, each with its own set of features and limitations:

  1. Data Export Service
    • Description: Allows you to manually export your Salesforce data on a weekly or monthly basis.
    • Features: CSV files of your data are sent to a secure location from where you can download them.
    • Limitations: Manual process; lacks automated real-time backups.
  2. Data Loader
    • Description: A client application for bulk import, export, update, or deletion of data.
    • Features: Supports scheduling and automation via command-line interface.
    • Limitations: Requires manual setup and scripting for automated processes.
  3. Salesforce Shield
    • Description: Advanced set of security and compliance tools, including Event Monitoring, Field Audit Trail, and Platform Encryption.
    • Features: Enhanced data retention and audit capabilities.
    • Limitations: Requires an additional license; primarily focused on compliance and security rather than backup and recovery.
  4. Weekly Export
    • Description: Similar to the Data Export Service but provides a weekly backup.
    • Features: Can be scheduled to run automatically.
    • Limitations: Data is exported weekly, which might not be sufficient for organizations needing more frequent backups.

Third-Party Backup Solutions

In addition to Salesforce’s native options, many organizations opt for third-party solutions to enhance their data recovery capabilities. These solutions often offer more comprehensive features:

  1. OwnBackup
    • Description: Comprehensive cloud-to-cloud backup and recovery solution.
    • Features: Automated daily backups, rapid restore capabilities, compliance reporting, and data comparison.
    • Benefits: Provides granular recovery options and robust compliance features.
  2. Spanning Backup for Salesforce
    • Description: Enterprise-grade backup solution for Salesforce data.
    • Features: Automated daily backups, point-in-time recovery, and easy data restores.
    • Benefits: User-friendly interface, detailed reporting, and reliable backup processes.
  3. CloudAlly
    • Description: Offers automated daily backups and data recovery for Salesforce.
    • Features: Includes backups for Salesforce data, metadata, and Chatter feeds.
    • Benefits: Secure storage, easy restoration, and compliance support.
  4. Datto Backupify for Salesforce
    • Description: Provides automated, continuous data protection.
    • Features: Includes daily automated backups, quick restore options, and secure data storage.
    • Benefits: Comprehensive protection and fast recovery times.
  5. Flosum Backup and Recovery
    • Description: Backup solution designed specifically for Salesforce environments.
    • Features: Offers daily automated backups, granular recovery options, and encryption.
    • Benefits: Seamless integration with Salesforce, strong security features.

Conclusion

Crafting a data recovery plan for your Salesforce org is not just about compliance; it’s about safeguarding your business’s most valuable asset—its data. By assessing your current backup solutions, defining clear recovery objectives, implementing robust backup strategies, ensuring security, regularly testing and validating your plan, and continuously improving your processes, you can build a resilient data recovery framework. Additionally, considering third-party solutions can further enhance your data protection measures. Ultimately, a well-crafted data recovery plan will provide peace of mind, knowing that your Salesforce data is secure and can be quickly restored in the event of a loss.

Categories
Blog

Salesforce CPQ: A Beginner’s Guide

Introduction

If you’re new to Salesforce CPQ, this guide will walk you through the basics and outline the key areas to focus on as you work towards mastering this essential business tool.

What is Salesforce CPQ?

Salesforce CPQ is a sales tool that allows companies to quickly and accurately generate quotes for orders. CPQ applications often work in conjunction with CRM platforms, ERP systems, and other business technology, allowing you to automate the end-to-end process of creating and managing quotes, contracts, and revenue.

Getting Started with Salesforce CPQ

1. Understanding the Basics

Before diving into the complex functionalities of Salesforce CPQ, it’s important to understand the basics:

  • Product Configuration: Learn how to set up and manage your product catalog. This includes understanding product bundles, options, and configuration rules.
  • Pricing: Understand different pricing models, such as cost-plus pricing, discount schedules, and multi-dimensional pricing.
  • Quoting: Familiarize yourself with the quote creation process, including template customization and quote approvals.

2. Key Features

  • Product Bundles: Group related products together for simplified selection.
  • Discounting: Apply various discount types and structures to ensure competitive pricing.
  • Approvals: Set up approval processes to maintain control over discounts and terms.

Topics to Master Salesforce CPQ

To become proficient in Salesforce CPQ, focus on mastering the following topics:

1. Product Rules and Configuration

Understanding product rules is essential for establishing guided selling processes that guarantee precise and optimized product configurations.

2. Pricing Strategies

Dive deep into pricing strategies, including:

  • Price Rules: Automate pricing calculations based on specific conditions.
  • Discount Schedules: Manage tiered or volume-based discounting.

3. Quote Templates

Learn how to customize quote templates to match your company’s branding and information requirements.

4. Advanced Approvals

Implement advanced approval processes to streamline and manage quote approvals efficiently.

5. Contract Management

Understand how to automate and manage the lifecycle of customer contracts, ensuring compliance and consistency.

6. Reporting and Analytics

Utilize Salesforce’s powerful reporting and analytics tools to monitor CPQ performance and make informed, data-driven decisions.

Best Practices for Salesforce CPQ

To get the most out of Salesforce CPQ, consider the following best practices:

1. Regular Updates and Maintenance

Keep your product catalog, pricing rules, and templates up to date to reflect current offerings and business rules.

2. User Training

Regularly train your sales team to ensure they are familiar with the latest features and best practices in using CPQ.

3. Process Optimization

Continuously review and refine your quoting processes to improve efficiency and accuracy.

4. Data Integrity

Ensure data quality and consistency across CPQ and other integrated systems to avoid errors and discrepancies.

5. Leverage Automation

Use CPQ’s automation capabilities to reduce manual tasks and increase productivity.

Specialization:

CPQ is specialized for sales teams to handle complex product configurations and pricing. It provides tools to create accurate quotes, manage product catalogs, apply pricing rules, and enforce discounting policies. This specialization helps sales teams to quickly generate quotes that are tailored to customer needs and company policies.

Conclusion

Mastering Salesforce CPQ requires a solid understanding of its fundamental components and continuous learning and optimization. By focusing on product configuration, pricing strategies, quote templates, approvals, and contract management, you can streamline your sales processes and improve efficiency. Keep your system updated, train your team, and leverage automation to maximize the benefits of Salesforce CPQ. With dedication and practice, you can become a Salesforce CPQ expert and drive significant value for your organization.

Categories
Uncategorized

Optimizing flows: Salesforce Admin Best Practices with Salesforce Flow for Beginners

1. Introduction

  • Learn how to streamline processes and improve efficiency with Salesforce Flow, the powerful tool that replaces Workflow Rules and Process Builder.

2. Importance of Flow Optimization

  • Time Savings: Automation reduces manual tasks, allowing teams to focus on more strategic activities.
  • Increased Accuracy: Automated processes minimize human error, ensuring data integrity.
  • Enhanced Productivity: Streamlined workflows improve overall efficiency and productivity.

3. Step-by-Step Flow Creation in Salesforce

  1. Identify the Process
  • Analyze current processes to identify areas for automation.
  1. Map Out the flow
  • Use flowcharts to visualize the steps involved.
  1. Build the Flow
  • Use Flow Builder to create the flow with triggers, elements, and logic.
  1. Test the Flow
  • Run tests to ensure everything works as expected.
  1. Deploy and Monitor
  • Implement the flow and monitor for any issues.

4. Common Pitfalls

  • Overcomplicating flows: Keep them simple and manageable.
  • Ignoring end-user needs: Ensure flows align with user requirements.
  • Inadequate testing: Always thoroughly test before deployment.

5. Best Practices

  • Keep it Simple: Avoid unnecessary complexity.
  • Regularly Review and Update: Periodically review flows for relevance.
  • Documentation: Maintain clear documentation for all flows.
  • User Training: Provide training to users on new flows.
  • Utilize Automation Tools: Leverage Flow capabilities like Subflows and Debugging tools.

6. Transitioning from Workflow Rules and Process Builder

Steps to migrate from Workflow Rules and Process Builder to Flow:

  1. Identify Existing Automations: List all current Workflow Rules and Process Builders.
  2. Analyze and Plan: Determine which can be combined or simplified in Flow.
  3. Recreate in Flow: Use Flow Builder to recreate the automation.
  4. Test Thoroughly: Ensure the new Flows work as expected.
  5. Deactivate Old Automations: Deactivate Workflow Rules and Process Builders once Flows are validated.

7. Conclusion

Optimizing Flow can significantly enhance productivity and accuracy. Follow these best practices to ensure smooth and efficient processes.

Categories
Blog

Unlocking the Power of Salesforce Einstein Copilot: Your Ultimate Guide

In the ever-evolving landscape of customer relationship management (CRM), Salesforce continues to set the bar high with its innovative solutions. One of the latest additions to its robust suite of tools is Salesforce Einstein Copilot, a groundbreaking AI-driven assistant designed to revolutionize how businesses interact with their customers and manage their operations. In this blog post, we will dive deep into what Salesforce Einstein Copilot is, its features, benefits, and how it can transform your business.

What is Salesforce Einstein Copilot?

Salesforce Einstein Copilot is an advanced AI-powered assistant integrated within the Salesforce platform. Leveraging the power of artificial intelligence and machine learning, Einstein Copilot assists users in navigating the CRM, automating tasks, making data-driven decisions, and ultimately enhancing productivity and customer satisfaction.

Key Features of Salesforce Einstein Copilot

  1. Intelligent Recommendations:
    • Einstein Copilot analyzes vast amounts of data to provide users with actionable insights and recommendations. Whether it’s suggesting the next best action for a sales lead or offering personalized product recommendations to customers, this feature ensures that you are always one step ahead.
  2. Natural Language Processing (NLP):
    • With advanced NLP capabilities, Einstein Copilot can understand and respond to natural language queries. Users can interact with the CRM using everyday language, making it more intuitive and user-friendly.
  3. Automation of Routine Tasks:
    • By automating repetitive tasks such as data entry, follow-ups, and scheduling, Einstein Copilot optimizes employee time, enabling them to concentrate on higher-level tasks.
  4. Enhanced Analytics:
    • The AI assistant provides deep insights through predictive analytics, helping businesses anticipate trends, identify opportunities, and mitigate risks before they become issues.
  5. Personalized Customer Interactions:
    • Einstein Copilot helps create highly personalized customer experiences by analyzing customer behavior, preferences, and history. This ensures that every interaction is relevant and tailored to the individual.

Benefits of Using Salesforce Einstein Copilot

  1. Increased Efficiency:
    • By automating routine tasks and providing intelligent recommendations, Einstein Copilot significantly boosts operational efficiency. Employees can accomplish more in less time, leading to improved productivity.
  2. Improved Decision-Making:
    • With data-driven insights and predictive analytics, businesses can make informed decisions quickly and confidently. This reduces the guesswork and enhances strategic planning.
  3. Enhanced Customer Satisfaction:
    • Personalization is key to customer satisfaction. Einstein Copilot ensures that interactions are meaningful and relevant, which leads to higher customer engagement and loyalty.
  4. Cost Savings:
    • Automation and improved efficiency translate to cost savings. Businesses can allocate resources more effectively and reduce the need for manual intervention.
  5. Competitive Advantage:
    • Staying ahead in today’s competitive market requires innovation. Adopting cutting-edge tools like Einstein Copilot positions businesses as forward-thinking and technologically adept.

How to Implement Salesforce Einstein Copilot

  1. Enable Generative AI:
  • Navigate to Setup, locate Generative AI, and enable it via the toggle switch. 

    2. Activate Einstein Copilot:

    • In Setup, search for Einstein Copilots and activate it using the toggle switch.

      3. Assign Permission Sets:

      • Assign pertinent permission sets: Einstein Copilot for Salesforce Admin and Einstein Copilot for Salesforce User.
        Conclusion

        Salesforce Einstein Copilot represents a significant leap forward in the realm of CRM and business automation. By harnessing the power of AI, it empowers businesses to operate more efficiently, make smarter decisions, and deliver exceptional customer experiences. Whether you are a small business or a large enterprise, integrating Einstein Copilot into your Salesforce environment can be a game-changer. Embrace the future of CRM with Salesforce Einstein Copilot and unlock the full potential of your business.

        Ready to take your business to the next level? Explore Salesforce Einstein Copilot today and see the difference it can make!

        Categories
        Blog

        Salesforce Summer ’24 Release: Create Rich Text Headings in Lightning App Builder

        The Salesforce Summer ’24 Release has brought a plethora of exciting features designed to enhance user experience and boost productivity. Among these features is the ability to create rich text headings in Lightning App Builder. This new capability allows users to add stylized and formatted headings, making their Lightning pages more engaging and easier to navigate.

        What is Lightning App Builder?

        Before diving into the new feature, let’s take a quick look at what Lightning App Builder is. Lightning App Builder is a point-and-click tool that allows Salesforce users to create custom pages for the Salesforce mobile app and Lightning Experience. Users can customize the layout and design of their pages, adding various components like lists, charts, forms, and now, rich text headings.

        Introducing Rich Text Headings

        The rich text heading feature allows users to add headings with rich text formatting options to their Lightning pages. This means you can now include bold, italic, underlined text, as well as different font sizes, colors, and even hyperlinks. These headings can help organize and highlight important sections on your pages, making them more visually appealing and user-friendly.

        Key Features of Rich Text Headings

        1. Customizable Formatting: Use various formatting options to make your headings stand out. Apply bold, italic, or underline styles, change font sizes and colors, and add hyperlinks to provide more context or navigate to other pages.

        2. User-Friendly Interface: The rich text editor is intuitive and easy to use, even for those who are not familiar with HTML or CSS. This ensures that any user, regardless of technical expertise, can create visually appealing headings.

        3. Enhanced Navigation: Well-formatted headings help users quickly find the information they need, improving overall navigation and user experience on your Lightning pages.

        How to Use Rich Text Headings in Lightning App Builder

        Using rich text headings in Lightning App Builder is straightforward. Here’s a step-by-step guide:

        1. Open Lightning App Builder:

           – Navigate to the Lightning App Builder from the Salesforce Setup menu.

        2. Select a Page to Edit:

           – Choose an existing Lightning page to edit or create a new one.

        3. Add a Rich Text Component:

           – From the component palette, drag the “Rich Text” component onto your page layout where you want to place the heading.

        4. Edit the Rich Text:

           – Click into the rich text component to open the rich text editor.

           – Enter your heading text and use the formatting options to style it as desired. You can make the text bold, italic, change the font size and color, and add hyperlinks.

        5. Save and Activate:

           – Once you are satisfied with the heading, save your changes.

           – Activate the page so that the new heading is visible to users.

        Example Use Case

        Imagine you are creating a custom sales dashboard in Lightning App Builder. You want to clearly separate different sections of the dashboard such as Sales Performance, Lead Generation, and Opportunities. Using rich text headings, you can create visually distinct headings for each section, making the dashboard more organized and easier to navigate.

        For example:

        Sales Performance: Add a bold, large-font heading in a striking color to highlight this crucial section.

        Lead Generation: Use italics and a different color to differentiate this section from others.

        Opportunities: Include a hyperlink in the heading to navigate to a detailed opportunities report.

        Benefits of Rich Text Headings

        1. Improved Readability: Well-formatted headings break up the text and make it easier for users to scan and find relevant information quickly.

        2. Enhanced Visual Appeal: Stylish headings contribute to a more professional and polished look for your Lightning pages.

        3. Better User Experience: Clear and distinct headings improve overall navigation and usability, helping users accomplish their tasks more efficiently.

        Conclusion

        The ability to create rich text headings in Lightning App Builder is a powerful enhancement in the Salesforce Summer ’24 Release. It empowers users to create more organized, visually appealing, and user-friendly Lightning pages. Whether you are a Salesforce admin, developer, or business user, this new feature will undoubtedly help you build better experiences for your Salesforce users.

        Explore the rich text heading feature today and start transforming your Lightning pages with engaging and informative headings.

        Categories
        Blog

        Embrace Personal Labels: Your New Organizational Tool in Salesforce Summer ’24

        The latest Salesforce Summer ’24 update introduces an exciting feature called Personal Labels. Imagine them as vibrant sticky notes for your records, enhancing your ability to organize your data uniquely and efficiently. Here’s why Personal Labels are about to become your favorite Salesforce tool.

        Discovering the Magic of Personal Labels

        Personal Labels are like magic markers in Salesforce. They let you tag records with your own special labels. No more digging through folders or getting lost in a sea of data. With Personal Labels, you’re the boss of how things are organized.

        The Benefits of Personal Labels

        Customized Organization: Personal Labels enable you to organize records according to your personal preferences. Whether you need to sort leads by urgency, projects by phase, or deals by region, you can create labels that align with your workflow.

        Quick Retrieval: Finding records becomes a breeze. Just type in the relevant label in the search bar, and watch as all the associated records appear instantly.

        Increased Efficiency: With everything neatly labeled, you can devote more time to essential tasks like closing deals and delighting customers, rather than spending time searching for information.

        Getting Started with Personal Labels

        Simple Label Creation

        1. Craft Your Labels: Navigate to any record and find the “Labels” section. Add a new label with a name that fits your needs, giving your record a personalized identifier.

        Assign Your Labels: Tagging records is straightforward. Open a record, go to the “Labels” section, and select the appropriate labels. It’s as simple as categorizing your belongings.

        Efficient Record Retrieval

        Use the search bar in Salesforce to locate records based on your labels. Type the label name, press enter, and your tagged records will be at your fingertips.

        If you want to know more, please refer to this article : Find Records Easily with Personal Labels

        Expert Tips for Effective Labeling

        1. Keep It Intuitive: Choose naming conventions that are easy to remember. Simplicity is key.
        2. Regular Maintenance: Periodically review your labels to ensure they are still relevant. Remove obsolete labels and keep your system tidy.
        3. Team Sharing: While Personal Labels are for individual use, sharing your labeling strategies with your team can promote a cohesive and efficient work environment.

        Limitation

        You can add labels to records on these objects.

        • Account
        • Cadence
        • Cadence Step Tracker
        • Call Script
        • Campaign
        • Contact
        • Case
        • Email Template
        • Lead
        • Opportunity
        • Orchestration Work Item
        • Task

        Conclusion

        Personal Labels in Salesforce Summer ’24 revolutionize how you organize and retrieve your records. Give them a try and experience the enhanced efficiency and ease of use they bring to your Salesforce experience. Organize smarter, work faster, and keep your sanity intact with Personal Labels!