Sweet Potato

Categories
Blog

Quick Guide to Salesforce Product Schedule

Introduction:

In the dynamic world of cloud computing and customer relationship management (CRM), Salesforce has emerged as a juggernaut, revolutionizing how businesses manage their interactions with clients. One key aspect of Salesforce’s success is its impressive revenue and quantity schedule, which serves as a testament to its robust business model and innovative solutions.

What is the Product Schedule?

In Salesforce, the product schedule feature allows you to create and manage revenue schedules and quantity schedules associated with Opportunity Products. This feature is particularly useful when dealing with revenue recognition, as it enables you to specify how and when revenue from a product or service will be recognized over time.

A product schedule represents the timeline for when revenue from an Opportunity Product will be recognized. It breaks down the total revenue amount into individual revenue segments, each associated with a specific date or period. In the meantime, it splits the quantity as well like revenue.

Enable Product Schedule at the Organisation Level

Product Schedules are available in Salesforce Enterprise, Performance, Unlimited, and Developer editions. Make sure your org is on one of these editions.

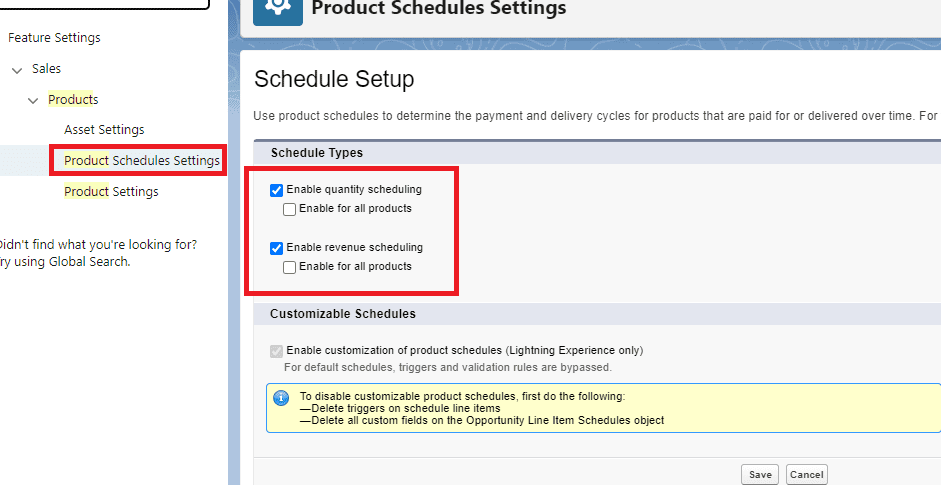
Go to Setup > Product Schedules Settings.

Enable Product Schedule at Product level

After enabling this, then go to the product page layout then add the relevant fields in the layout.

Based on the Revenue Schedule Type, Revenue Installment Period and Number of Installments field the product revenue is split while adding the product to the opportunity. This is similar to quantity as well.

Finally, go to the opportunity product page layout and add the schedule related list.

Revenue Schedule and Quantity Schedule

After adding the product under the opportunity, you can go to the opportunity product related tab, see the schedule related list, and see the revenue and quantity split.

Note: After adding a new product then we should go to the product schedule setting again and enable the quantity and revenue schedule.

Conclusion

Salesforce’s impressive revenue and quantity schedule reflect not only its financial success but also its commitment to innovation, customer satisfaction, and adaptability. The company’s ability to evolve with the ever-changing business landscape positions it as a trailblazer in the CRM industry. As Salesforce continues to grow its user base and refine its offerings, its journey is an inspiring case study for businesses aspiring to achieve long-term success in the competitive world of technology and enterprise solutions.

Categories
Blog

How Salesforce Service Cloud Can Boost Customer Retention and Satisfaction

Introduction:

In today’s competitive business landscape, customer retention and satisfaction are paramount to sustained success. As businesses strive to build lasting relationships with their customers, they must prioritize providing exceptional service and support. One powerful tool that enables businesses to achieve these goals is Salesforce Service Cloud. In this blog post, we’ll explore how Service Cloud can elevate customer retention and satisfaction by streamlining support processes, enabling personalized interactions, and fostering seamless communication across channels.

Understanding Customer Retention and Satisfaction:

Before diving into the specifics of Service Cloud, let’s first establish why customer retention and satisfaction are so crucial. Customer retention refers to the ability of a business to keep its existing customers over time, while customer satisfaction measures the level of contentment and loyalty customers feel towards a brand. Studies have shown that acquiring new customers can be up to five times more expensive than retaining existing ones, making customer retention a cost-effective strategy for businesses. Moreover, satisfied customers are more likely to become loyal advocates for a brand, driving referrals and positive word-of-mouth.

Introduction to the Salesforce Service Cloud:

Salesforce is renowned as a leading customer relationship management (CRM) platform, empowering businesses to manage their sales, marketing, and customer service operations in one integrated solution. Service Cloud, a prominent component of the Salesforce ecosystem, excels as a holistic customer service solution engineered to deliver exceptional support experiences. With features ranging from case management and a knowledge base to multichannel support and AI-powered insights, Service Cloud equips businesses with the tools they need to exceed customer expectations.

How Salesforce Service Cloud Improves Customer Retention:

One of the key ways Service Cloud enhances customer retention is by streamlining support processes. Through centralized case management, agents can efficiently track and resolve customer inquiries, ensuring timely and consistent responses. Additionally, Service Cloud’s knowledge base empowers customers to find answers to common questions on their own, reducing the need for agent intervention and fostering self-service adoption. By providing a seamless support experience, businesses can increase customer satisfaction and loyalty.

Enhancing Customer Satisfaction with the Service Cloud:

Service Cloud empowers businesses with its multi-channel support capabilities, facilitating customer engagement across diverse channels like email, chat, social media, and phone. This omnichannel approach ensures that customers can reach out for support through their preferred channels, enhancing convenience and accessibility. Moreover, Service Cloud leverages automation and artificial intelligence to improve response times and service quality, allowing businesses to deliver personalized interactions at scale. By leveraging data-driven insights and predictive analytics, businesses can anticipate customer needs and proactively address issues before they arise.

Examples and Case Studies:

Numerous businesses across industries have successfully leveraged Service Cloud to drive customer retention and satisfaction. For example, XYZ Corporation, a leading e-commerce retailer, implemented Service Cloud to centralize their customer support operations and provide personalized recommendations to shoppers. As a result, XYZ saw a 20% increase in customer retention and a significant improvement in customer satisfaction scores. Similarly, ABC Services, a financial institution, utilized Service Cloud’s multichannel capabilities to deliver timely support to clients across various communication channels, resulting in a 30% reduction in resolution times and a 15% increase in customer satisfaction.

Tips for Implementing Service Cloud Effectively:

For businesses considering implementing Service Cloud, it’s essential to approach the process strategically. Proper training and ongoing support for users are critical to maximizing the platform’s capabilities and ensuring successful adoption. Additionally, businesses should prioritize customization and integration with existing systems to tailor Service Cloud to their unique needs and workflows. By investing in the right resources and expertise, businesses can unlock the full potential of Service Cloud to drive customer retention and satisfaction.

Conclusion:

In conclusion, Salesforce Service Cloud offers businesses a powerful suite of tools to enhance customer retention and satisfaction. By streamlining support processes, enabling personalized interactions, and fostering seamless communication across channels, Service Cloud empowers businesses to deliver exceptional support experiences that keep customers coming back. As businesses continue to prioritize customer relationships, Service Cloud stands out as a strategic investment in long-term success.

Call to Action:

Ready to take your customer service to the next level with Salesforce Service Cloud? Contact us today to learn more. Let’s work together to elevate your customer retention and satisfaction!
Categories
Blog

Salesforce Project Deployment Best Practices: Ensuring a Seamless Transition

Introduction:

When it comes to managing your Salesforce environment, ensuring smooth and seamless deployments is crucial. Whether you’re implementing new features, making changes to existing configurations, or updating data, following best practices can help you avoid service interruptions and maintain the integrity of your CRM system. In this blog, we’ll explore the top Salesforce deployment best practices that enable you to make changes without causing downtime or disruption. We will delve into the seamless and efficient deployment processes achieved through the strategic use of change sets in our Salesforce projects, highlighting the key advantages and best practices that have proven instrumental in delivering successful implementations.

1. Extensive Testing in Sandboxes:

One of the fundamental best practices for Salesforce deployment is to thoroughly test changes in sandbox environments. Salesforce offers different types of sandboxes, including Developer, Developer Pro, Partial, and Full, which allow you to replicate your production environment for testing. This is your first line of defence against errors and issues.

2. Change Sets for Controlled Deployment:

Salesforce Change Sets provide a controlled and efficient way to bundle configuration changes and deploy them from one environment to another, such as from sandbox to production. Ensure that your changes are bundled logically, and use validation steps to check for errors before deployment.

3. Plan for Off-Peak Hours:

Schedule deployments during off-peak hours to minimize the impact on users. Even though Salesforce is known for its availability, deploying during low-traffic times reduces the chances of service interruptions.

4. Robust Rollback Strategy:

Always have a well-defined rollback plan in place. While you aim for successful deployments, preparedness for potential issues is critical. A rollback strategy helps you quickly revert to the previous system state if needed.

5. Communication and Stakeholder Involvement:

Proactive communication with stakeholders and end-users is vital. Clearly communicate the purpose of the deployment, expected timelines, and instructions for reporting issues.

6. Data Backups:

Back up your data before deploying changes. Data loss can be catastrophic, so having a secure backup ensures you can recover if the need arises.

7. Performance Testing:

Perform load and performance testing in your sandbox to evaluate how changes will impact system performance and to ensure that the system can handle new configurations without degradation.

8. Monitor During Deployment:

Throughout the deployment process, keep a close eye on the system. A dedicated team should be ready to address any issues that may arise in real-time. Monitoring tools can help you identify and resolve problems quickly.

9. User Training and Adoption:

If the deployment involves changes in user processes, offer training and guidance to users ahead of time. Educated users are more likely to embrace new features and processes.

10. Post-Deployment Validation:

After the deployment is complete, validate that the changes have been applied correctly and that the system is functioning as expected. This final check ensures the success of the deployment.

Conclusion:

Salesforce deployments are an essential part of managing your CRM system effectively. By following these best practices, you can ensure that your Salesforce deployments are executed smoothly, with minimal service interruption, and a high level of user satisfaction. Planning, testing, and communication are key elements in achieving a seamless transition during deployments.
Incorporating these best practices into your Salesforce deployment strategy will help you maintain data integrity, improve user adoption, and ensure the continuous success of your Salesforce implementation.

Categories
Blog

Enable Email-to-Salesforce

Introduction

Email-to-Salesforce is a feature that allows you to associate emails with Salesforce records, enabling seamless integration of your email communication with the CRM platform. This feature enhances collaboration and ensures that relevant correspondence is centralized within Salesforce records, providing a comprehensive view of interactions.

Here’s a step-by-step guide on how to set up and use Email-to-Salesforce:

1. Enable Email-to-Salesforce:

a. In Salesforce, go to Personal Setting.
b. In the Quick Find box, type “Email-to-Salesforce.”
c. Select “Email-to-Salesforce” from the search results.
d. Enable the feature by checking the “Enable Email-to-Salesforce” checkbox.

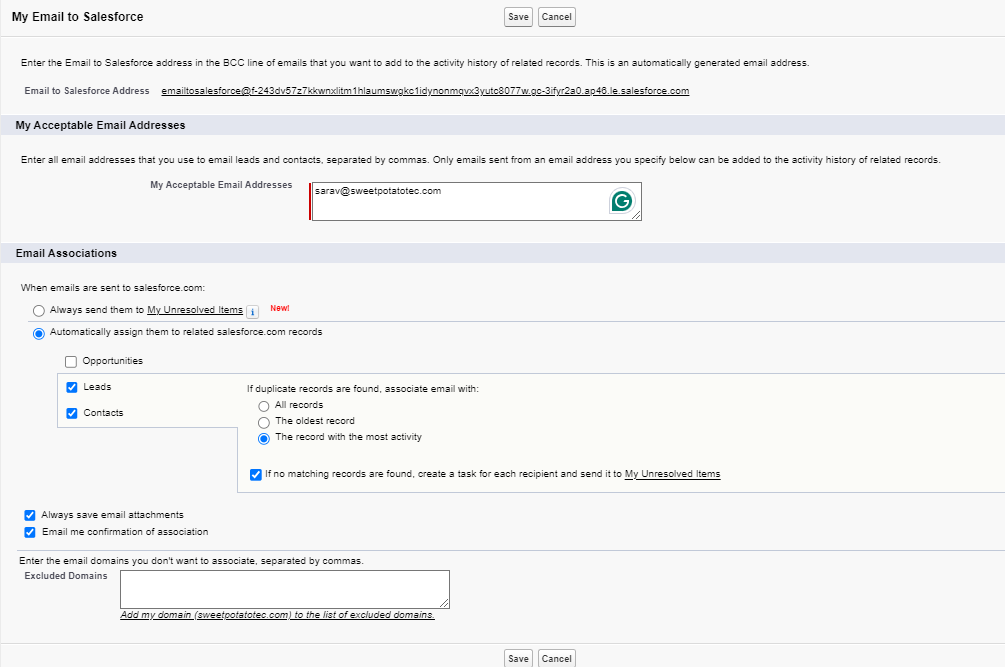
Please see the below image,

2. Forwarding Emails:

After enabling Email-to-Salesforce, you will be provided with a unique email address specific to your organization.

Forward emails you want to associate with Salesforce records to this unique email address by adding them in the BCC of your email.

3. Verification:

Salesforce automatically associates the forwarded email with the specified record based on the email address.

Verify the association by checking the “Emails” related list on the corresponding record in Salesforce.

If there are no records with the email address then it will be landed into ‘My Unresolved Items’ and then from there you can attach it to the records.

4. Customizing Email-to-Salesforce:

Adjust settings such as the allowed email domains and other parameters in the Email-to-Salesforce settings based on your organization’s needs.

Tips and Best Practices:

Email Content and Attachments:

The entire content of the forwarded email, including attachments, is associated with the Salesforce record.

Security and Permissions:

Ensure that users forwarding emails have the necessary permissions to associate emails with Salesforce records.

Error Handling:

Monitor any error notifications or bounce-back emails from Salesforce, as they may indicate issues with the association process.
By using Email-to-Salesforce, you streamline communication tracking and ensure that valuable correspondence is linked directly to the relevant records in your Salesforce instance. This integration enhances collaboration and provides a comprehensive view of interactions, contributing to a more efficient and organized workflow.

Conclusion:

In conclusion, the Email-to-Salesforce integration is poised to be a catalyst for positive change in our customer relationship management practices. Its potential to drive operational efficiency, improve collaboration, and deepen our understanding of customer interactions positions it as a strategic asset for our organization.

Categories
Blog

Automating File Attachments from Opportunities to Accounts in Salesforce Using Flows

Introduction:

In the dynamic world of Salesforce, automation plays a crucial role in enhancing productivity and efficiency. One common requirement for sales teams is the seamless transfer of files and documents associated with opportunities to their corresponding accounts. In this blog post, we’ll explore how you can achieve this using the power of Salesforce Flows.

Understanding the Challenge:

In Salesforce, opportunities and accounts are often interlinked, and it’s common for sales professionals to work with various documents and files throughout the sales process. Manually attaching these files from opportunities to their respective accounts can be time-consuming and prone to errors. Automation provides a solution to this challenge, allowing you to streamline the process and ensure accuracy.

Create a Flow:

Build a flow that captures the necessary information and performs the file attachment. Use the ‘Record Trigger’ element to initiate the flow when the specified conditions are met.

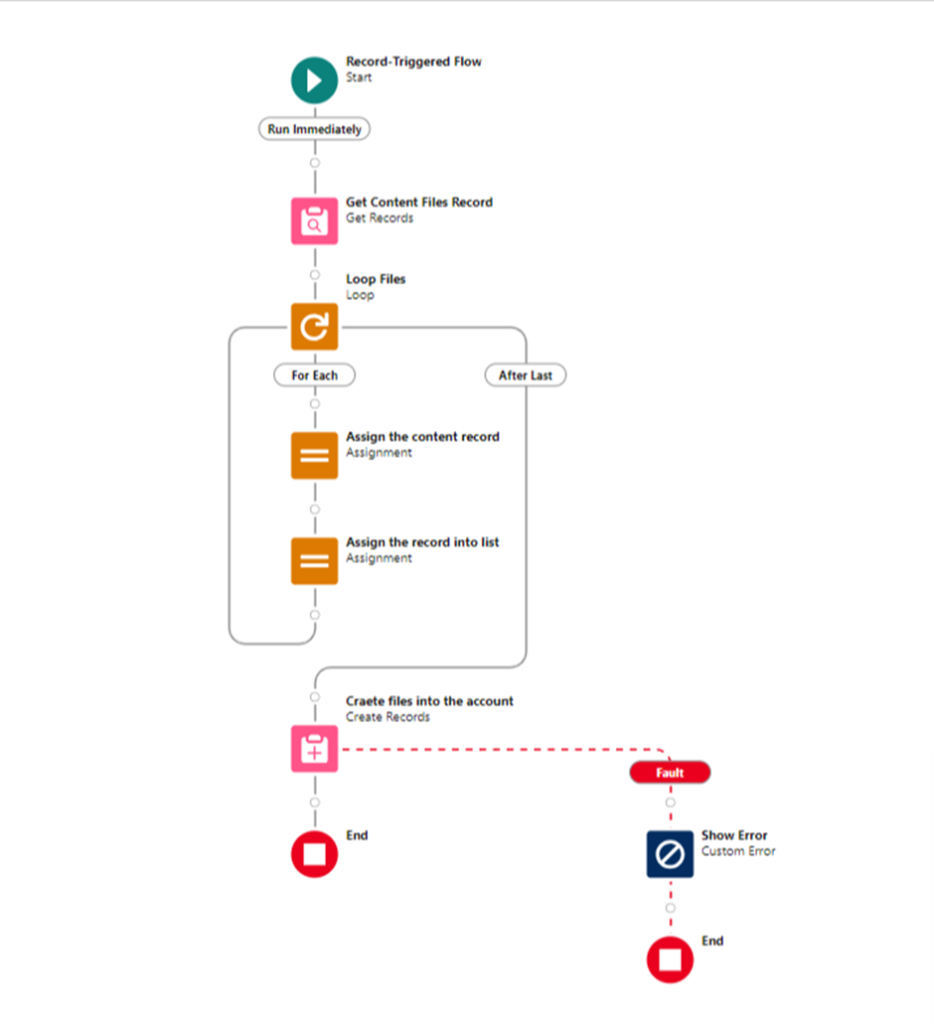
1. Start – Record Triggered Flow:

Begin the automation process by setting up a record-triggered flow. Specify the condition for triggering the flow, such as when the opportunity status is marked as “Closed-Won.” This ensures that the flow initiates at the right point in the sales process.

2. Get Records – Retrieve Content Document Files:

Utilize the ‘Get Records’ element within the flow to retrieve content document files associated with the triggered opportunity record. This step ensures that the relevant files are identified and ready for further processing.

3. Loop – Iterate Through Retrieved Files:

Implement a loop within the flow to iterate through each file obtained from the ‘Get Records’ step. This looping mechanism allows for the systematic handling of multiple files associated with the closed-won opportunity.

4. Note: Define Variables:

Establish two essential variables to facilitate efficient record handling:
a. Content Record (CR):
A single-record variable designed to hold information for each content file.

b. Content Record List (CRL):
A list variable that accumulates multiple content records. This list serves as a container for all files associated with the opportunity.

5. Assignment 1 – Assign Retrieved Records to CR Variable:

Within the flow, Create the ‘Assignment’ element to assign the content records obtained in the loop to the Content Record (CR) variable. This step ensures that each file’s information is stored in a structured manner.

6. Assignment 2 – Assign CR Variable to CRL:

Utilize another ‘Assignment’ element to transfer the single Content Record (CR) into the Content Record List (CRL). This transformation allows for the consolidation of information from individual files into a comprehensive list.

7. Create Records – Attach Multiple Records:

Leverage the ‘Create Records’ element within the flow, utilizing the resource from the Content Record List (CRL). This step efficiently creates multiple records, attaching the content of each file to the associated account. It ensures that the entire process is automated, saving time and reducing the risk of errors.

8. Add Fault Path Element for Error Handling:

Enhance the robustness of your flow by adding a fault path element to the ‘Create Records’ element. In the event of an error during the file attachment process, this fault path allows users to view and understand the specific error details.
Configure the fault path to capture any potential errors that might occur, such as missing data or issues with the file attachment process. This ensures that even if an error occurs, it is captured and users are notified to take appropriate action.

Conclusion

Automating file attachments in Salesforce not only saves valuable time for sales teams but also minimizes the risk of errors associated with manual processes. The streamlined workflow empowers sales professionals to focus on core tasks, ultimately contributing to a more efficient and productive sales cycle. As your organization embraces automation, the benefits extend beyond time-saving to improved data accuracy, reduced administrative burden and enhanced overall Salesforce user experience. By staying at the forefront of Salesforce innovation, your business is better positioned to adapt and thrive in today’s competitive landscape.

Categories
Blog

Maximizing Efficiency with Salesforce Data Loader: Leveraging ContentNote and ContentDocumentLink

Introduction:

In today’s fast-paced business environment, managing and organizing content efficiently is crucial for any successful organization. Salesforce, as a leading Customer Relationship Management (CRM) platform, provides powerful tools like Data Loader to facilitate seamless data management. In this blog post, we’ll delve into the nuances of utilizing Salesforce Data Loader to upload and link Content Notes via ContentNote and ContentDocumentLink objects.

What are ContentNote and ContentDocumentLink?

ContentNote represents a text-based note in Salesforce, allowing users to store important information directly in the platform. On the other hand, ContentDocumentLink establishes a relationship between Salesforce records and files (ContentNote or ContentVersion). This allows for easy access to files from relevant records.

Prerequisites for Uploading Content Note

Before diving into the Data Loader process, ensure you have the following:

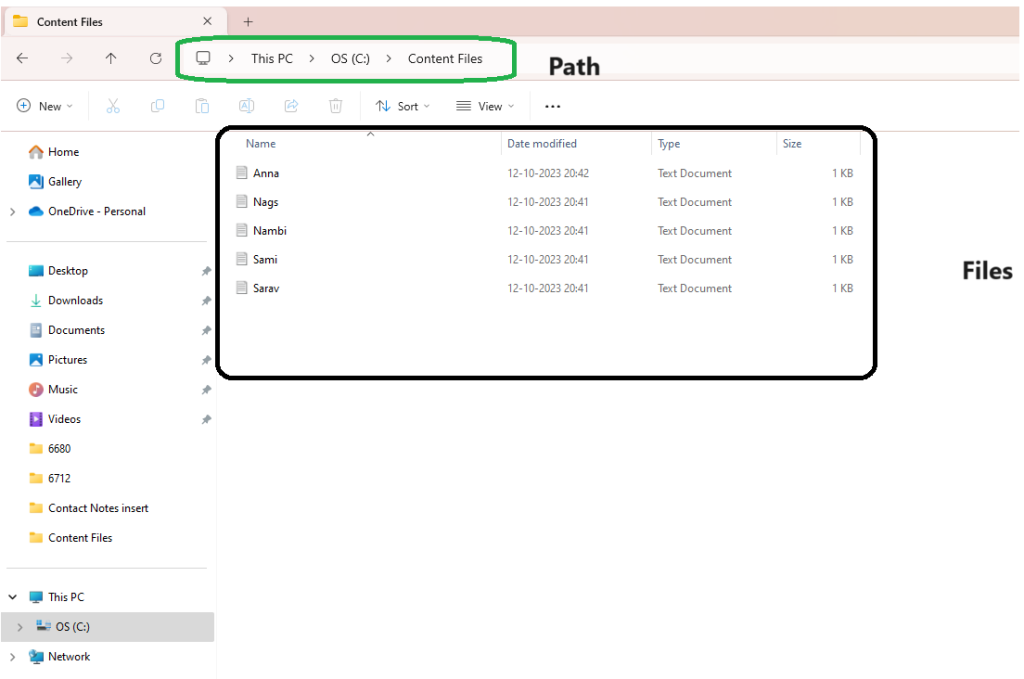
  1. Text File on Your Local Desktop: The content you wish to upload should be stored in a text file on your local desktop. This file will be referenced in the Excel sheet.

2. Excel File with Content Path Column: Create an Excel file containing a column named Content that specifies the file path of the notes. This will be used as a reference point for Data Loader.

Steps to Upload Content Note using Data Loader

  1. Login to Salesforce: Open Salesforce and log in to your account.
  2. Open Data Loader: Launch the Salesforce Data Loader.
  3. Select Operation: Choose the operation you want to perform. In this case, it will be Insert.
  4. Select Object Type: Pick ContentNote from the list of available objects.
  5. Browse for CSV File: Locate and select the Excel file containing the Content column.
  6. Mapping Fields: Map the Content in your CSV file to the appropriate field in Salesforce.

7. Start the Insert Operation: Click on the ‘Create or Edit a Map’ button. This will start the insertion process.
8. Monitor Progress: Keep an eye on the progress bar to ensure successful insertion.
9. Review Results: After completion, review the results to confirm that the Content Notes have been uploaded successfully.

Establishing Links with ContentDocumentLink

Now that we have uploaded Content Notes, let’s proceed to link them with relevant records.

  1. Data Loader Steps: Follow the above steps to insert the ContentDocumentLink.
  2. Browse for CSV File: Locate and select the Excel file or your success file from the previous insert notes, ensuring it contains a column with the Salesforce record IDs to be linked.

3. Mapping Fields: Map the `LinkedEntityId` (representing the Salesforce record) and `ContentDocumentId` (representing the Content Note) columns appropriately.

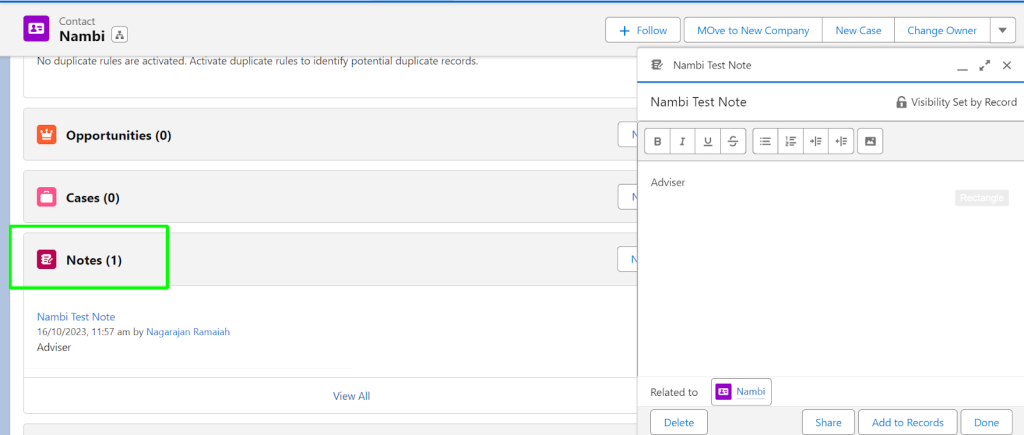
We have successfully uploaded a comprehensive list of notes associated with the contact records. You can conveniently access the contact record-related list, and effortlessly review the uploaded notes.

Conclusion

Effectively utilizing Salesforce Data Loader to upload and link Content Notes via ContentNote and ContentDocumentLink objects can significantly enhance your data management capabilities. By following these steps and ensuring the necessary prerequisites, you’ll be well on your way to optimizing your Salesforce experience.

Remember, a well-organized database with accessible content can streamline your workflow and lead to more informed decision-making. So, start leveraging these powerful Salesforce features today!

Categories
Blog

Exploring Salesforce Spring ’24 Transformative Feature Highlights

Introduction:

Welcome to the Spring ’24 feature highlights! Discover the latest advancements,from Lightning report upgrades to dynamic forms and dashboard refinements, this release promises to redefine your user experience.

1) Effortlessly Modify Lightning Report Filters:

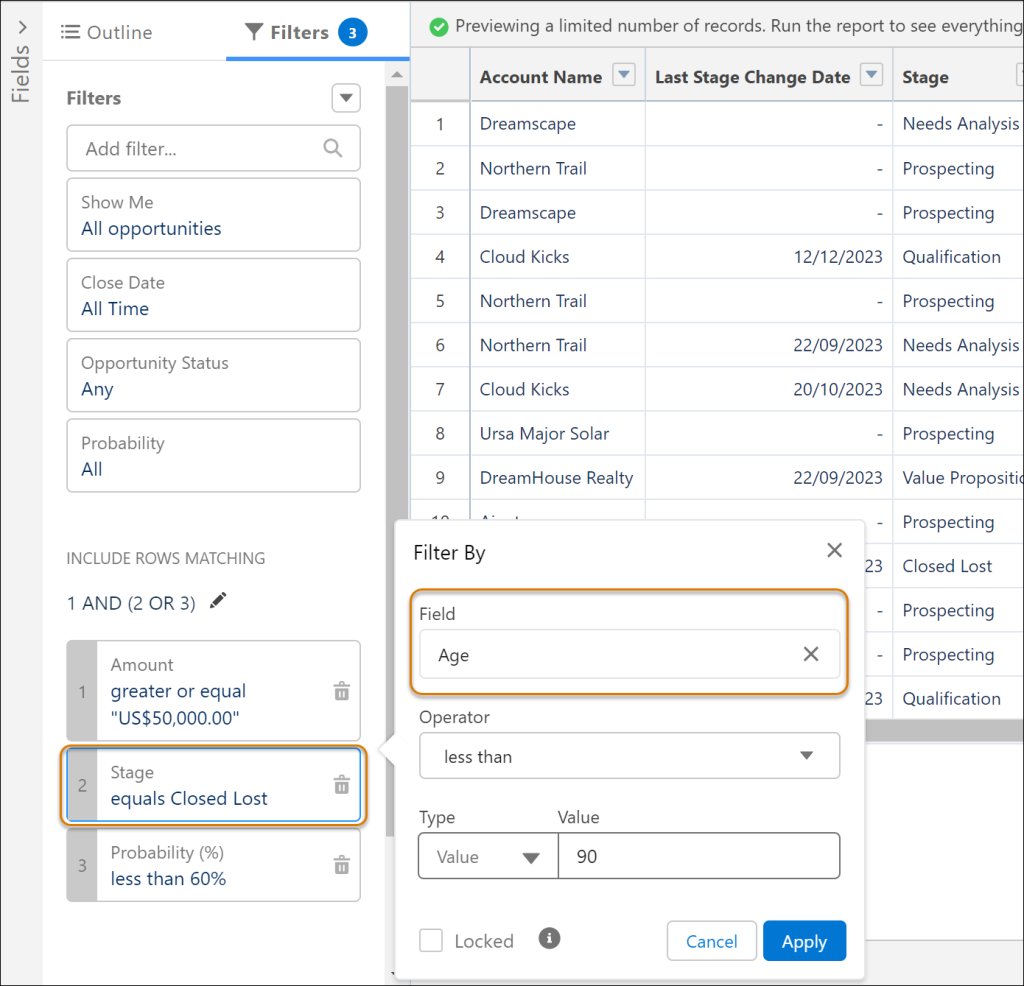
Efficiently update Lightning report filters by changing fields without deleting and recreating filters. Easily transition from, say, Stage to Age in an opportunity report without reconfiguring the filter. Unlike earlier releases, now modify the field, operator, and value seamlessly. This feature, initially in Salesforce Classic, is now available in Lightning.

2) Customize Field Visibility Based on Device in Dynamic Forms:

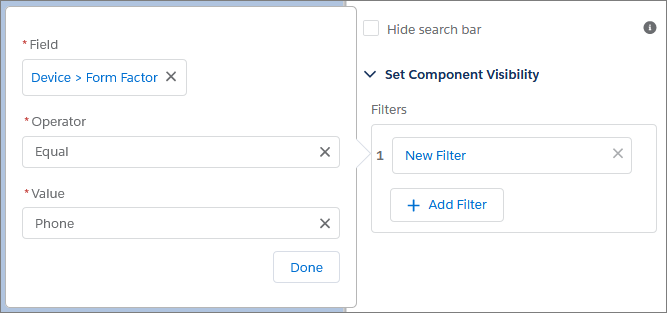
Previously, visibility rules for device form factors applied to sections and components, not individual fields. Now, gain finer control over desktop and mobile Lightning record pages, restricting field visibility based on form factors like desktop or phone

3) Enhance Dynamic Forms Pages with Related Object Fields:

Access and display data from related objects by dragging cross-object fields onto your record page in the Lightning App Builder.

4) Enable Permission Set Groups Across All Editions:

Permission Sets Groups are now accessible in all editions of Salesforce.

5) Receive Alerts Prior to Deleting Permission Sets Assigned to Users:

Deleting a permission set within an assigned permission set group now triggers an error, ensuring users are not assigned to empty groups. Previously, this action was unrestricted, leading to assignments without enabled permissions.

6) Updated Migrate to Flow Tool:

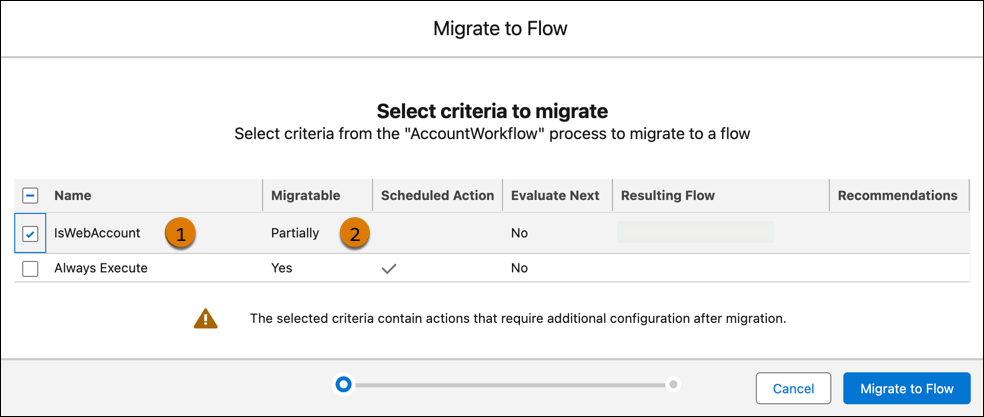
The Migrate to Flow tool enables partial migration for most actions, except invocable ones. The migration results specify actions requiring additional configuration in Flow Builder to finalize the migration.

7) Einstein Search Enabled by Default:

Einstein Search is now enabled in all Salesforce orgs unless the DoNotAutoEnable flag is active. Opt-out via the Search settings page. Previously, orgs lacking MySearchPilot and SearchAssistant permissions couldn’t access Einstein Search

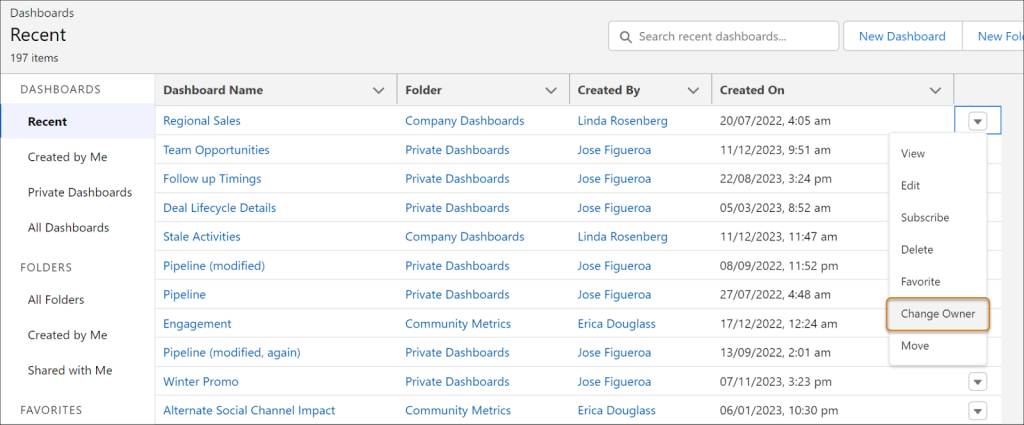
8) Transfer Lightning Dashboard Ownership:

Simplify Lightning dashboard ownership transfer for role changes or when an owner departs. Now, efficiently update ownership for multiple dashboards in one go, including sending email notifications to the new owner. In the past, granting access to a new owner involved cloning or recreating the dashboard.

9) Optimize Data Viewing with More Dashboard Filters:

In all Salesforce editions, users can now use up to five filters on Lightning dashboards to refine and target data. This allows the reuse of the same dashboard for different teams, saving time and effort, and eliminating the need to clone dashboards for various business units.

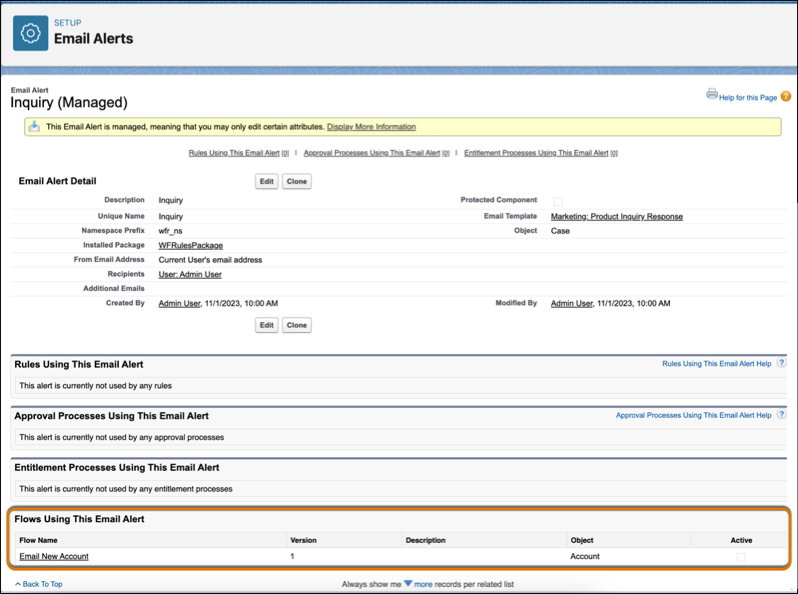
10) Find Flows Utilizing Email Alerts:

This update introduces a new category in Email Alerts Setup, allowing you to identify flows utilizing email alerts.

Conclusion:

With Spring ’24, Salesforce introduces transformative features, promising enhanced user adaptability and streamlined administrative control. Explore these new features to unlock the full potential of your Salesforce platform.

Categories
Blog

Empowering Your Salesforce Experience: A Dive into Custom Metadata and Custom Settings

Categories
Blog

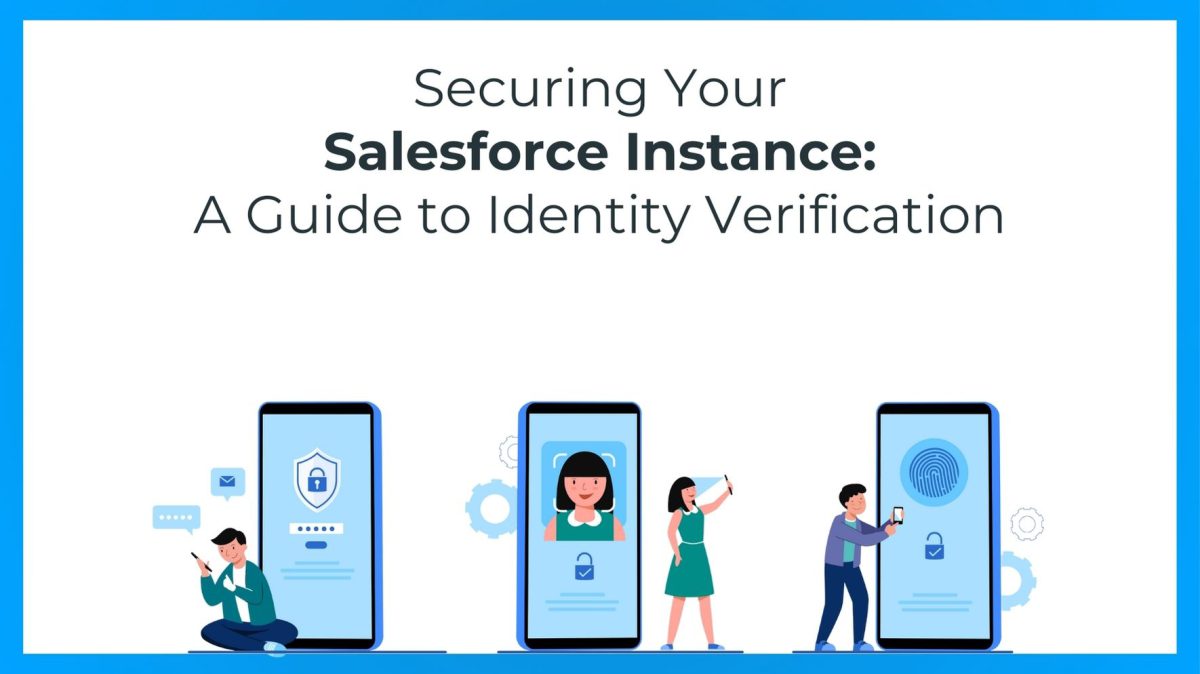
Securing Your Salesforce Instance: A Guide to Identity Verification

This blog delves into the essential strategies and features within Salesforce that guarantee robust authentication, protecting your organization’s sensitive data from unauthorized access. How important is the Salesforce auto enabled the MFA for direct logins in Spring ’24.

Identity Verification

Approaches to Validate Your Identity:

An additional layer of security is initiated during the login process, necessitating not just your username and password but also a specified verification method to authenticate your identity.

  1. Salesforce Authenticator Mobile App
    Salesforce Authenticator offers a quick and straightforward method for completing multi-factor authentication (MFA) and various identity verification processes. Easily verify your activity with a simple finger tap and can be employed with other online accounts that are compatible with time-based one-time password (TOTP) authenticator apps.
  2. Built-In Authenticator
    Register Touch ID, Face ID, or Windows Hello as your native authenticator for identity verification during MFA logins or device activation challenges. These authenticators leverage your device’s biometric readers like fingerprint or facial scanners, and may include PIN or password verification. Registration links your native authenticator to your Salesforce account, providing a personalized verification method. If this option isn’t visible, consult with your Salesforce administrator to enable it.
  3. Security Key
    Enroll a physical security key for identity verification during multi-factor authentication (MFA) logins or in the event of a device activation challenge. Choose security keys compliant with WebAuthn (FIDO2) or Universal Second Factor (U2F) standards. The registration procedure establishes your security key as a personalized verification method, forging a link between your Salesforce account and the key. If the option is not visible, consult your Salesforce admin to enable it.
  4. Third-Party Authenticator App
    Enroll a third-party authenticator app to authenticate your identity during multi-factor authentication (MFA) logins or when faced with a device activation challenge. Examples of such authenticator apps include Google Authenticator, Microsoft Authenticator, or Authy, which generate a time-based one-time password (TOTP) for entry into Salesforce. The registration process establishes your authenticator app as a personalized verification method by establishing a connection between your Salesforce account and the app.
  5. Temporary Code
    If you are unable to utilize your typical multi-factor authentication (MFA) verification method, request your Salesforce admin to provide you with a temporary verification code. This code remains valid for a duration set by your admin, typically ranging from 1 to 24 hours. You also have the option to manually expire the code ahead of the designated timeframe if it is no longer needed.
  6. One-Time Password via SMS Text Message
    This option is exclusively accessible to external users logging in to customer or partner Experience Cloud sites.If your account is linked to a verified mobile number, Salesforce dispatches a one-time password (OTP) code via text message to your phone. In the absence of a verified mobile number, you’ll be prompted to register one during your Salesforce login. Registering your mobile number not only verifies it but also activates this method for future challenges. In case of a mobile number change, kindly get in touch with your Salesforce admin.
  7. One-Time Password via Email
    This feature is exclusively accessible to external users logging in to customer or partner Experience Cloud sites. For this method, Salesforce delivers a one-time password (OTP) code to the email address linked to your account. It’s important to note that the code has a validity period of 24 hours.

Regain Access in Case Your Verification Method is Replaced, Lost, or Malfunctions.

Certain situations may impact your ability to use your identity verification method for multi-factor authentication (MFA) logins to your Salesforce account. These issues typically fall into two categories. The first scenario involves the loss or replacement of your verification method, such as getting a new mobile phone or computer, requiring a switch of your authenticator app or built-in authenticator to the new hardware, or replacing a lost security key with a new one. The second possibility is a disruption in the connection between your verification method and your Salesforce account. In such cases, to restore MFA login access, it is necessary to disconnect the affected verification method and then either reconnect it or register a replacement method.

Resolve Login Problems

Unable to access your account? Forgotten your username or password, or faced with a lockout due to numerous login attempts? To address login issues, consider the following solutions.

  1. Your Salesforce administrator establishes password policies governing login attempts, lockout durations, and password requirements for your organization.
  2. If you possess the “User Single Sign-On” permission, only an administrator can reset your password. For assistance, reach out to your Salesforce administrator; note that password resets aren’t available through the Salesforce mobile app.
  3. To enhance data privacy, consider changing your password at regular intervals, especially if your administrator enforces periodic password expiration.
  4. In case you forget your password, there are retrieval options. If you find yourself locked out, wait until the lockout period concludes or contact your Salesforce admin for assistance.
  5. Accessing Salesforce from an untrusted IP range or using a new browser or app may prompt identity verification.
  6. For logging in with a company-specific My Domain login URL, click “Use Custom Domain” and input the login URL in the Custom Domain field (e.g., MyDomainName.my.salesforce.com for production).
  7. To log in to a sandbox, utilize either its My Domain login URL or https://test.salesforce.com. For the My Domain login URL, use MyDomainName–SandboxName.sandbox.my.salesforce.com, where MyDomainName is the org’s My Domain name, and SandboxName is the sandbox name.
Categories
Blog

Revolutionizing User Security: The Paradigm in Salesforce User Management

Managing users is a crucial skill for Salesforce Admins, involving ensuring proper data access and addressing security concerns. Admins safeguard confidential data by limiting access to users who require it for their tasks.

To ensure long-term efficiency, create a user management plan. Protect your data by allowing users access only to the specific information they need. Assigning correct profiles, roles, and data access enhances system flexibility for the future.

Follow the principle of granting access based on job requirements. Implement this using profiles, permission sets, and permission set groups.

Key Steps for Managing Users in Salesforce:

  1. Create Logins: Learn to generate usernames and login accounts. Implement Multi-Factor Authentication (MFA) for enhanced security. User Management Module on Trailhead
  2. Assign Profiles: Start by assigning minimal access profiles when granting user access.
  3. Enhance Object Access with Permission Sets: Use permission sets to grant access to objects beyond profile settings. Explore bundle sets with the Permission Set Groups module on Trailhead.
  4. Role Assignment for Record Access: Create a role hierarchy to mirror your team structure. Assign roles to provide easier access to records within teams.
  5. Determine and Grant Data Access: Ensure effective data access with organization-wide defaults and sharing rules for teams with varying data protection needs.

The Future: Security Model Driven by Permission Sets and Groups

To give users access, start with a low access profile, then use permission sets and permission set groups to grant more access based on their roles. This way, you can customize permissions without making many profiles, and reuse them easily. Even though profiles still have permissions for now, it is better to use permission sets to manage security. Although the End of Life (EOL) enforcement for permissions on profiles is paused, a security model led by permission sets is recommended over profiles. Next, let’s learn how to create good permission sets and groups, and what to put in a profile or a permission set.

This outlines what information is appropriate for a profile and what should be included in a permission set.

Permission SetsProfiles
System & Custom PermissionsMinimum Access
Object & Field PermissionsDefaults(RecordTypes,Apps)
Connected App, Apex Classes & VF pages accessPage Layout Assignment
Apps, Tab settings & Record Types(no defaults)Login Hours/IP Ranges

Organizing Permission Sets and Permission Set Groups

Permission sets offer excellent reusability in a permission set-led model, aligning with our desire for technology efficiency. Consider the example of “Opportunity Access.” Create a comprehensive permission set covering all Object CRUD for opportunities, enable all fields for field-level security (simplified with the Winter ’24 Release), and include relevant apps, record types (non-defaults), user permissions, and custom permissions related to opportunities.
Some admins believe they must create multiple versions of the same permission set to manage diverse access levels, which can become challenging. Great news! You don’t need to go through it all. Use permission set groups with a muting feature to easily give the same “Opportunity Access” permissions to different groups.

Conversion from Profiles to Permission Sets and Permission Set Groups

Moving from profiles to permission sets and groups is pivotal for refining your security model. If your organization is new to this shift, start by documenting user personas and aligning them with permission sets. Use user access policies for seamless migration and adhere to best practices like clear naming, Assignment Expiration, custom report types, and custom permissions over profiles in formulas. For those familiar with the dev console, querying user access control is a viable option, streamlining the transition effectively.

SELECT Id, SObjectType, PermissionsRead, PermissionsCreate FROM ObjectPermissions where SObjectType = ‘Opportunity’

Salesforce Future Ideas:

Salesforce is working on implementing user-suggested ideas. Vote for essential ideas related to access summary on the user and managing object CRUD access in Object Manager.

Vote for Access Summary Idea
Vote for Object Access in Object Manager Idea

As Salesforce evolves, actively participate in the community, provide feedback, and vote on enhancements. By adopting best practices, admins can navigate the dynamic landscape of Salesforce user management with confidence.