Sweet Potato

Categories
Blog

Securing Your Salesforce Instance: A Guide to Identity Verification

This blog delves into the essential strategies and features within Salesforce that guarantee robust authentication, protecting your organization’s sensitive data from unauthorized access. How important is the Salesforce auto enabled the MFA for direct logins in Spring ’24.

Identity Verification

Approaches to Validate Your Identity:

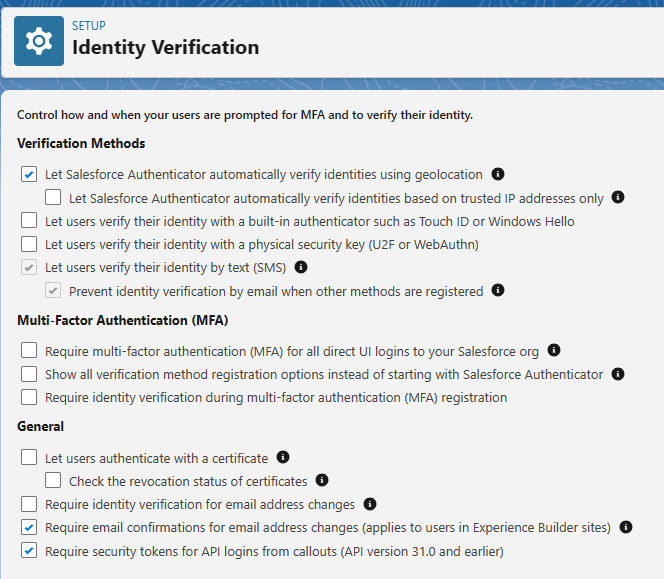
An additional layer of security is initiated during the login process, necessitating not just your username and password but also a specified verification method to authenticate your identity.

  1. Salesforce Authenticator Mobile App
    Salesforce Authenticator offers a quick and straightforward method for completing multi-factor authentication (MFA) and various identity verification processes. Easily verify your activity with a simple finger tap and can be employed with other online accounts that are compatible with time-based one-time password (TOTP) authenticator apps.
  2. Built-In Authenticator
    Register Touch ID, Face ID, or Windows Hello as your native authenticator for identity verification during MFA logins or device activation challenges. These authenticators leverage your device’s biometric readers like fingerprint or facial scanners, and may include PIN or password verification. Registration links your native authenticator to your Salesforce account, providing a personalized verification method. If this option isn’t visible, consult with your Salesforce administrator to enable it.
  3. Security Key
    Enroll a physical security key for identity verification during multi-factor authentication (MFA) logins or in the event of a device activation challenge. Choose security keys compliant with WebAuthn (FIDO2) or Universal Second Factor (U2F) standards. The registration procedure establishes your security key as a personalized verification method, forging a link between your Salesforce account and the key. If the option is not visible, consult your Salesforce admin to enable it.
  4. Third-Party Authenticator App
    Enroll a third-party authenticator app to authenticate your identity during multi-factor authentication (MFA) logins or when faced with a device activation challenge. Examples of such authenticator apps include Google Authenticator, Microsoft Authenticator, or Authy, which generate a time-based one-time password (TOTP) for entry into Salesforce. The registration process establishes your authenticator app as a personalized verification method by establishing a connection between your Salesforce account and the app.
  5. Temporary Code
    If you are unable to utilize your typical multi-factor authentication (MFA) verification method, request your Salesforce admin to provide you with a temporary verification code. This code remains valid for a duration set by your admin, typically ranging from 1 to 24 hours. You also have the option to manually expire the code ahead of the designated timeframe if it is no longer needed.
  6. One-Time Password via SMS Text Message
    This option is exclusively accessible to external users logging in to customer or partner Experience Cloud sites.If your account is linked to a verified mobile number, Salesforce dispatches a one-time password (OTP) code via text message to your phone. In the absence of a verified mobile number, you’ll be prompted to register one during your Salesforce login. Registering your mobile number not only verifies it but also activates this method for future challenges. In case of a mobile number change, kindly get in touch with your Salesforce admin.
  7. One-Time Password via Email
    This feature is exclusively accessible to external users logging in to customer or partner Experience Cloud sites. For this method, Salesforce delivers a one-time password (OTP) code to the email address linked to your account. It’s important to note that the code has a validity period of 24 hours.

Regain Access in Case Your Verification Method is Replaced, Lost, or Malfunctions.

Certain situations may impact your ability to use your identity verification method for multi-factor authentication (MFA) logins to your Salesforce account. These issues typically fall into two categories. The first scenario involves the loss or replacement of your verification method, such as getting a new mobile phone or computer, requiring a switch of your authenticator app or built-in authenticator to the new hardware, or replacing a lost security key with a new one. The second possibility is a disruption in the connection between your verification method and your Salesforce account. In such cases, to restore MFA login access, it is necessary to disconnect the affected verification method and then either reconnect it or register a replacement method.

Resolve Login Problems

Unable to access your account? Forgotten your username or password, or faced with a lockout due to numerous login attempts? To address login issues, consider the following solutions.

  1. Your Salesforce administrator establishes password policies governing login attempts, lockout durations, and password requirements for your organization.
  2. If you possess the “User Single Sign-On” permission, only an administrator can reset your password. For assistance, reach out to your Salesforce administrator; note that password resets aren’t available through the Salesforce mobile app.
  3. To enhance data privacy, consider changing your password at regular intervals, especially if your administrator enforces periodic password expiration.
  4. In case you forget your password, there are retrieval options. If you find yourself locked out, wait until the lockout period concludes or contact your Salesforce admin for assistance.
  5. Accessing Salesforce from an untrusted IP range or using a new browser or app may prompt identity verification.
  6. For logging in with a company-specific My Domain login URL, click “Use Custom Domain” and input the login URL in the Custom Domain field (e.g., MyDomainName.my.salesforce.com for production).
  7. To log in to a sandbox, utilize either its My Domain login URL or https://test.salesforce.com. For the My Domain login URL, use MyDomainName–SandboxName.sandbox.my.salesforce.com, where MyDomainName is the org’s My Domain name, and SandboxName is the sandbox name.
Categories
Blog

Revolutionizing User Security: The Paradigm in Salesforce User Management

Managing users is a crucial skill for Salesforce Admins, involving ensuring proper data access and addressing security concerns. Admins safeguard confidential data by limiting access to users who require it for their tasks.

To ensure long-term efficiency, create a user management plan. Protect your data by allowing users access only to the specific information they need. Assigning correct profiles, roles, and data access enhances system flexibility for the future.

Follow the principle of granting access based on job requirements. Implement this using profiles, permission sets, and permission set groups.

Key Steps for Managing Users in Salesforce:

  1. Create Logins: Learn to generate usernames and login accounts. Implement Multi-Factor Authentication (MFA) for enhanced security. User Management Module on Trailhead
  2. Assign Profiles: Start by assigning minimal access profiles when granting user access.
  3. Enhance Object Access with Permission Sets: Use permission sets to grant access to objects beyond profile settings. Explore bundle sets with the Permission Set Groups module on Trailhead.
  4. Role Assignment for Record Access: Create a role hierarchy to mirror your team structure. Assign roles to provide easier access to records within teams.
  5. Determine and Grant Data Access: Ensure effective data access with organization-wide defaults and sharing rules for teams with varying data protection needs.

The Future: Security Model Driven by Permission Sets and Groups

To give users access, start with a low access profile, then use permission sets and permission set groups to grant more access based on their roles. This way, you can customize permissions without making many profiles, and reuse them easily. Even though profiles still have permissions for now, it is better to use permission sets to manage security. Although the End of Life (EOL) enforcement for permissions on profiles is paused, a security model led by permission sets is recommended over profiles. Next, let’s learn how to create good permission sets and groups, and what to put in a profile or a permission set.

This outlines what information is appropriate for a profile and what should be included in a permission set.

Permission SetsProfiles
System & Custom PermissionsMinimum Access
Object & Field PermissionsDefaults(RecordTypes,Apps)
Connected App, Apex Classes & VF pages accessPage Layout Assignment
Apps, Tab settings & Record Types(no defaults)Login Hours/IP Ranges

Organizing Permission Sets and Permission Set Groups

Permission sets offer excellent reusability in a permission set-led model, aligning with our desire for technology efficiency. Consider the example of “Opportunity Access.” Create a comprehensive permission set covering all Object CRUD for opportunities, enable all fields for field-level security (simplified with the Winter ’24 Release), and include relevant apps, record types (non-defaults), user permissions, and custom permissions related to opportunities.
Some admins believe they must create multiple versions of the same permission set to manage diverse access levels, which can become challenging. Great news! You don’t need to go through it all. Use permission set groups with a muting feature to easily give the same “Opportunity Access” permissions to different groups.

Conversion from Profiles to Permission Sets and Permission Set Groups

Moving from profiles to permission sets and groups is pivotal for refining your security model. If your organization is new to this shift, start by documenting user personas and aligning them with permission sets. Use user access policies for seamless migration and adhere to best practices like clear naming, Assignment Expiration, custom report types, and custom permissions over profiles in formulas. For those familiar with the dev console, querying user access control is a viable option, streamlining the transition effectively.

SELECT Id, SObjectType, PermissionsRead, PermissionsCreate FROM ObjectPermissions where SObjectType = ‘Opportunity’

Salesforce Future Ideas:

Salesforce is working on implementing user-suggested ideas. Vote for essential ideas related to access summary on the user and managing object CRUD access in Object Manager.

Vote for Access Summary Idea
Vote for Object Access in Object Manager Idea

As Salesforce evolves, actively participate in the community, provide feedback, and vote on enhancements. By adopting best practices, admins can navigate the dynamic landscape of Salesforce user management with confidence.

Categories
Blog

A Roadmap to Mastering Salesforce and Becoming an Application Architect

In the Salesforce technology realm, I began my journey as an administrator, achieving my admin certification after two years. Subsequently, I obtained the Platform App Builder certification. With the aspiration to evolve into a Salesforce architect, I’ve chosen the path of an Application Architect.

To fulfil the requirements for this role, I’ve outlined a certification roadmap:

Platform App Builder ✔️

Platform Developer

Sharing and Visibility Architect ✔️

Data Architect

Having successfully completed the Platform App Builder and Sharing and Visibility Architect certifications, my current focus is on attaining the Data Architect certification.

This strategic progression aligns with my goal of becoming a proficient Salesforce Application Architect.

1. Gain Salesforce Administrator and Developer Experience:

Acquire hands-on experience as a Salesforce Administrator and Developer. Understand the Salesforce platform, configuration, customization, and declarative development using tools like Process Builder and Flow.

2. Earn Salesforce Certifications:

Salesforce certifications are crucial for showcasing your skills and expertise. Start with fundamental certifications and progress to advanced ones. Relevant certifications for an Application Architect include:

Salesforce Certified Administrator

Salesforce Certified Platform Developer I and II

Salesforce Certified Application Architect

3. Deepen Your Technical Knowledge:

Develop a deep understanding of Salesforce architecture patterns, data modeling, security, and integration mechanisms. Gain proficiency in Apex, Lightning Components, and other Salesforce technologies.

4. Gain Experience in Large Implementations:

Work on projects involving large-scale Salesforce implementations. This experience will expose you to complex business requirements, integration challenges, and the need for scalable solutions.

5. Explore Specialized Certifications:

Pursue specialized certifications that align with your career goals, such as:

Salesforce Certified Data Architecture and Management Designer

Salesforce Certified Integration Architecture Designer

Salesforce Certified System Architect

6. Master Integration and Security:

Develop expertise in integrating Salesforce with external systems using various patterns (REST, SOAP, etc.). Understand security considerations and implement best practices for data security and access control.

7. Understand Business Processes:

Application Architects need to align technical solutions with business goals. Understand different industries, business processes, and how Salesforce can be tailored to meet specific business needs.

8. Improve Soft Skills:

Develop strong communication and leadership skills. Application Architects often need to convey technical concepts to non-technical stakeholders and collaborate effectively with cross-functional teams.

9. Get Involved in the Salesforce Community:

Join Salesforce community groups, forums, and attend events. Networking with other professionals in the Salesforce ecosystem can provide valuable insights, guidance, and potential career opportunities.

10. Apply for Leadership Roles:

Seek roles that involve leadership and architectural responsibilities. This could include positions like Technical Lead, Solution Architect, or similar roles where you can demonstrate your ability to design and implement complex solutions.

11. Pursue Advanced Certifications:

Work towards advanced certifications such as the Salesforce Certified Technical Architect (CTA). Achieving CTA is the pinnacle of Salesforce certifications and demonstrates the highest level of expertise.

12. Build a Portfolio:

Showcase your expertise through a portfolio that includes details of projects you’ve worked on, problems you’ve solved, and the impact of your contributions.

13. Continuous Learning:

The technology landscape evolves rapidly. Stay updated on new Salesforce releases, features, and industry best practices. Attend webinars, conferences, and participate in ongoing training.

14. Seek Mentorship:

Connect with experienced Salesforce architects and seek mentorship. Learning from those who have already navigated similar career paths can provide valuable insights.

Becoming a Salesforce Application Architect is a dynamic process that involves a combination of technical skills, certifications, soft skills, and real-world experience. Stay committed to continuous learning, adapt to industry changes, and demonstrate your ability to architect solutions that align with business objectives.

Categories
Blog

Next-Gen Collaboration: Proven Strategies for Remote Teams

Introduction:

  • Set the stage by acknowledging the rise of remote work and its impact on team collaboration.
  • Emphasize the need for effective strategies to ensure seamless collaboration in virtual environments.
  • Preview key strategies to be explored in the blog.

  1. Leveraging Collaboration Tools:
    • Discuss the importance of selecting the right collaboration tools for remote teams.
    • Highlight popular tools for communication, project management, and document sharing.
    • Provide insights on integrating these tools into daily workflows.

  2. Establishing Clear Communication Channels:
    • Emphasize the significance of clear communication in remote teams.
    • Discuss the role of synchronous (real-time) and asynchronous (non-real-time) communication.
    • Provide tips for setting communication norms to avoid misunderstandings.

  3. Building a Virtual Team Culture:
    • Explore the concept of a virtual team culture and its impact on collaboration.
    • Discuss strategies for fostering team spirit and camaraderie in a remote setting.
    • Showcase examples of companies with strong virtual cultures.

  4. Effective Project Management:
    • Explore project management methodologies tailored for remote teams.
    • Discuss the benefits of agile or other adaptive approaches in dynamic remote environments.
    • Provide tips for setting clear goals, milestones, and deadlines.

  5. Encouraging Regular Check-ins and Meetings:
    • Discuss the importance of regular team meetings in maintaining connection.
    • Explore different meeting formats, including stand-ups, sprint reviews, and retrospectives.
    • Provide guidelines for facilitating engaging virtual meetings.

  6. Embracing Flexibility and Autonomy:
    • Discuss the advantages of offering flexibility in work hours and task autonomy.
    • Explore how a results-oriented approach can enhance productivity.
    • Share success stories of teams thriving with flexible work arrangements.

  7. Addressing Time Zone Challenges:
    • Acknowledge the challenges posed by different time zones in remote teams.
    • Provide tips for managing time zone differences effectively.
    • Discuss the importance of asynchronous collaboration in global teams.

  8. Encouraging Knowledge Sharing:
    • Emphasize the value of knowledge sharing within remote teams.
    • Discuss the role of knowledge repositories, wikis, and collaborative documents.
    • Share examples of companies that prioritize knowledge sharing in remote settings.

Conclusion:

  • Summarize key strategies for effective remote team collaboration.
  • Reinforce the idea that successful collaboration in remote teams requires a combination of tools, communication practices, and a positive team culture.
  • Encourage readers to implement and adapt these strategies to suit their team’s unique needs.
Categories
Blog

A Guide to Managing Duplicate Record Sets in Your Database

Merging duplicates using Duplicate Record Sets in Salesforce is an effective way to streamline data management and ensure data accuracy within your Salesforce organization. Here’s a step-by-step guide to help you merge duplicates using Duplicate Record Sets.

  1. Access the Duplicate Record Sets Tab: Log in to Salesforce and navigate to the Duplicate Record Sets tab.

2. Create a New Duplicate Record Set: Click on the “New” button to create a new Duplicate Record Set.

3. Define Duplicate Record Set Details: Provide the duplicate rule name and save the record.

4. Create Duplicate Record Items: Create Duplicate Record Items against the Duplicate Record Set using the New button and select the accounts that need to be merged.

5. Merge Selected Duplicates Refresh the page and then Initiate the merge process for the selected duplicate records using the Compare and Merge button and then click the ‘Next’ button.

6. Confirm Merge Operation: Confirm the fields and merge details and finalize the merge operation to consolidate the selected duplicate records into a single, clean record. Select master record and field data from any of the records(either from master or child) that’s going to be merged and Click Next.

7. Finalize Merge Operation: Once selected all the data for the master record click ‘Merge’ button to merge both the account into a single master record.

By following these steps, you can effectively manage and merge duplicate records using the Duplicate Record Sets tab in Salesforce, ensuring data accuracy and maintaining a clean data environment. If you have any further questions or need additional assistance, please don’t hesitate to reach out.

Categories
Blog

How to Restrict Users from Using Data Loader in Salesforce: A Step-by-Step Guide

Introduction

Salesforce’s Data Loader is a powerful tool that enables users to insert, update, upsert, delete, and export records in Salesforce. While it can significantly streamline data management processes, there are instances where restricting access to Data Loader becomes necessary to maintain data integrity and security within the Salesforce environment. Here’s a comprehensive guide on how to effectively restrict users from using Data Loader in Salesforce:

Step 1: Log in to Salesforce

Access your Salesforce account and navigate to the Setup menu by clicking on the gear icon in the top right corner.

Step 2: Access Connected Apps

In the Setup menu, under the  “Apps” and then click on “Manage Connected Apps” to access the list of installed apps in your Salesforce organization. Locate and click on the connected app associated with Data Loader Partner.

Step 3: Modify Connected App Policies

Within the connected app settings, adjust the policies to restrict access for specific user profiles or permission sets. You can modify the OAuth policies, such as specifying IP ranges or enforcing multi-factor authentication, to control access to the connected app. Click on Edit Policies and select Admin approved users are pre-authorized for Edit Policies.

Step 4: Customize User Access

Select the user profiles or permission sets that should have restricted access to the Data Loader connected app. Click on the profile→Assigned Connected Apps and add  Data Loader partner to the Enabled Connected Apps.

Step 5: Save the Changes

After customizing the connected app policies and user access settings, save the changes to apply the new access restrictions to the Data Loader connected app.

By following these steps, you can effectively control and restrict user access to Data Loader, ensuring data security and compliance within your Salesforce environment.

Categories
Blog

Data vs MetaData in Salesforce

Categories
Blog

My Salesforce Sharing and Visibility Architecture Certification Journey

Introduction:

I’m Kailas Nambi, a Team Lead at Sweet Potato Tec. When I ventured into Salesforce, I discovered the significance of mastering sharing and visibility architecture. It’s more than just a certification; it’s the gateway to unlocking Salesforce’s full potential. In this blog, I’ll share my journey to obtaining the Salesforce Sharing and Visibility Architecture certification and the insights I gained along the way.

Embarking on a Salesforce Journey:

My journey into the world of Salesforce started like many others, with a passion for technology and a desire to explore the limitless possibilities of cloud-based solutions. Armed with previous certifications and hands-on experience, I felt it was time to take my knowledge to the next level. That’s when I set my sights on the Salesforce Sharing and Visibility Architecture certification, recognizing the significant role it plays in shaping the landscape of Salesforce solutions.

Understanding the Certification:

The Salesforce Sharing and Visibility Architecture certification is a cornerstone in the Salesforce certification ecosystem. It’s an advanced certification that dives deep into the intricacies of data access, sharing models, security, and governance within Salesforce. Understanding the concepts of roles, profiles, permission sets, and sharing rules is fundamental to this certification. It’s a vital credential for any Salesforce architect or administrator looking to design and implement effective data access strategies for their organization.

Exam Preparation Strategy:

Achieving this certification isn’t a walk in the park. It requires dedication, thorough understanding, and a structured approach to preparation. During my journey, I relied on various resources. Salesforce’s official documentation and Trailhead modules are treasure troves of knowledge. They provided in-depth insights into the intricacies of data security and sharing, and I highly recommend seeking out peers who are also on the certification journey. Additionally, consider taking practice exams to gauge your readiness.

I will outline my week-by-week plan detailing how I successfully achieved the Salesforce Sharing and Visibility Architecture certification.

Week 1: Foundational Understanding

  1. Exam Guide Review (Day 1): Begin by thoroughly reviewing the official Salesforce Sharing and Visibility Architecture exam guide to understand the topics and their weightage.

https://trailhead.salesforce.com/en/credentials/sharingandvisibilityarchitect

  1. Trailhead Modules (Days 2-7): Start with Trailhead modules related to Sharing and Visibility. These provide a solid foundation and practical exercises.
  2. Study Groups (Days 7-14): Join online Salesforce study groups or forums. Participate in discussions and ask questions for clarification.

Week 2: Object-Level Security and Role Hierarchy

  1. Object-Level Security (Days 15-21): Dive into object-level security by studying Profiles, Permission Sets, Record Types, and Object Permissions.

https://trailhead.salesforce.com/content/learn/projects/keep-data-secure-in-a-recruiting-app/fls-perm-sets-sharing

  1. Role Hierarchy (Days 22-24): Learn about the role hierarchy and how it impacts data sharing.

Week 3: Declarative and Programmatic Sharing

  1. Declarative Sharing (Days 25-28): Study sharing settings, sharing rules, and criteria-based sharing. Practice configuring these settings in a Salesforce Developer Edition.

https://trailhead.salesforce.com/users/jklok/trailmixes/sharing-visibility-declarative-sharing-part-1

  1. Programmatic Sharing (Day 29): Understand how to use Apex triggers, classes, and Visualforce to implement custom sharing logic.

https://developer.salesforce.com/docs/atlas.en-us.apexcode.meta/apexcode/apex_bulk_sharing_creating_with_apex.htm

Week 4: Practice and Review

  1. Practice Exams (Days 30-31): Take as many practice exams as possible. Analyse your results to identify areas where you need improvement.
  2. Review Weak Areas (Days 32-33): Focus on your weaker areas. Revisit the official documentation, practice exercises, and online resources to reinforce your understanding.
  3. Final Review and Time Management (Days 34-35): Review the key concepts, security best practices, and common pitfalls. Work on improving your time management skills to complete the exam within the allocated time.

The Exam Experience:

On exam day, you’ll face tough scenarios and questions testing your data-sharing model design skills. Time management is crucial. Break complex questions into manageable parts for efficient problem-solving. Stay calm, trust your knowledge, and remember key concepts.

Conclusion:

Earning the Salesforce Sharing and Visibility Architecture certification is a significant achievement that showcases both knowledge and practical expertise in data sharing and visibility within Salesforce. The journey is demanding but invaluable in terms of knowledge. If you’re considering this certification, approach it with determination, patience, and a thirst for knowledge. It will open doors for professional growth in the Salesforce ecosystem. Good luck on your journey!

Categories
Blog

Dynamic Forms: User-Friendly Interface

Introduction:

In today’s fast-paced business world, Salesforce remains the go-to platform for organizations seeking to streamline their operations and strengthen customer relationships. However, as businesses grow and evolve, the need for a more flexible and user-centric approach to data management becomes increasingly vital. Enter dynamic forms, a groundbreaking feature in Salesforce that’s changing the game by revolutionizing how users interact with their CRM systems.

In this blog, we’ll delve into the world of dynamic forms and discover how they’re transforming the Salesforce experience. Dynamic forms aren’t just about data fields and layouts; they’re about empowering users to tailor their CRM interfaces to their unique needs, enhancing productivity, and driving better decision-making. Join us as we explore the key components, benefits, and practical applications of dynamic forms in Salesforce, and learn how this innovative feature is reshaping the way businesses manage their customer data.

What Are Dynamic Pages?

Dynamic pages in Salesforce represent a quantum leap in the customization and adaptability of CRM interfaces. Unlike traditional static page layouts, dynamic pages are user-centric, responding dynamically to individual roles, preferences, and objectives. These pages are highly customizable, allowing administrators and developers to craft responsive interfaces that evolve with the needs of the user.

Why Dynamic Pages Matter:

The traditional one-size-fits-all approach to CRM interfaces no longer suffices.Dynamic Forms empower users to directly adjust the layout of a record’s detail page within the Lightning Page interface.The creation of Dynamic Forms begins within the Lightning App Builder, where you can work with your Record Detail component.Within Dynamic Forms, fields and sections are treated as individual nested components, offering enhanced flexibility for arranging and setting visibility rules.

Salesforce’s adoption of Dynamic Forms represents a strategic shift towards a more intuitive and customizable user experience, leaving behind the constraints of Classic Page Layouts.

Key Components of Dynamic Pages:

Dynamic pages consist of several key components:

Dynamic Layouts: These allow users to display different sections or components of a record based on conditions, ensuring that users only see what’s relevant.

Dynamic Components: These can be added or removed based on user criteria, ensuring that each user sees the most pertinent information.

Visibility Rules: These define when and under what circumstances certain components or fields are displayed, giving users a seamless and tailored experience.

Creating Dynamic Pages:

Creating dynamic pages is a straightforward process in Salesforce

The quickest way to begin the process and to open Lightning App Builder is to navigate to a record within a Custom Object, and click Edit Page from the Setup dropdown menu.

Dynamic Forms adds some new features to the Lightning App Builder. You see a new Fields tab in the left-hand components pane. And, the Fields tab contains the fields associated with your custom object and a Field Section component.  

Once in the Lightning App Builder, select your Record Detail component (the one that currently contains your fields as dictated by the Page Layout), and click Upgrade Now.

You’ll be asked to select the source for your Dynamic Form – ie. the Page Layout that you want to use as the foundation for it. Select the one that makes the most sense, and click Finish.

You’ll now find that all your fields and sections have been migrated into the Lightning Page as individual nested components.

You now have the ability to freely move fields around on the Lightning Page as you would any other component. This means that your Dynamic Form can be split into multiple sections, and moved separately around the page. This is a huge change, and allows a lot more flexibility and freedom than Page Layouts could ever allow. You can also change whether your fields are always displayed or only displayed under certain circumstances using Filter Criteria.

There’s also the ability to manage the visibility of fields and sections, as with other components on the Lightning Page.

We can also create new tabs and add fields and field sections to those tabs to make pages more readable and load faster.

One of the best parts of is the Visibility Rules to show/hide fields and sections based on certain criteria, which sometimes would take custom development to accomplish it.

Now you can also choose to show certain fields to certain profiles by setting up the component visibility.

Benefits of Dynamic Pages:

The advantages of dynamic pages in Salesforce are manifold:

Improved User Adoption: Users are more likely to embrace CRM systems that are tailored to their needs, leading to higher user adoption rates.

Reduced Clutter: Dynamic pages help declutter the interface by only showing relevant information, reducing cognitive overload.

Catering to Diverse Roles: Dynamic pages empower organizations to serve the unique requirements of different user roles, from sales representatives to customer support agents.

Conclusion:

Dynamic pages in Salesforce represent a paradigm shift in CRM customization, allowing businesses to create interfaces that adapt to users’ ever-changing needs. By embracing dynamic pages, organizations can enhance user productivity and ultimately improve customer relationships. Start by experimenting with dynamic layouts, components, and visibility rules to see how they can transform your CRM experience.

Categories
Blog

Salesforce Winter ’24 Admin Features

Introduction:

With each new release, Salesforce continues to empower businesses to connect with their customers, streamline operations, and drive growth.

In this blog post, we’ll take you on a journey through the top 10 most exciting features and updates that Winter ’24 brings to the table. From enhanced customer experiences to productivity-boosting tools, Winter ’24 promises to deliver a range of capabilities that will leave Salesforce users inspired and ready to take their organizations to the next level. Let’s dive in and discover how Salesforce continues to lead the way in transforming how businesses connect, engage, and succeed.

1) Dynamic Forms for Standard Objects

Dynamic Forms are exclusively compatible with objects that are supported by Lightning Web Components. Objects like Campaigns, Tasks, and Products do not support dynamic forms. From Winter ’24 on, Salesforce enabled dynamic forms for standard objects.

Feature 1

2) Preview Summary Formulas in Lightning Reports


Now you have the ability to preview the formulas when you click on a function rather than clicking in and viewing the formula.

Feature 2

3. Transfer Dashboard Ownership

In Winter ’24, you have the ability to change ownership of a dashboard if someone leaves the company.

Feature 3

4. Sharing Enhancements

Use reports to see who has access to accounts from manual shares and account teams.

Create a custom report type on the Account Share object and then a report to see which users and groups can access account records that are shared manually or through account teams.

Feature 4

5. Permissions Enhancements

Now, you have the power to generate reports that provide insights into custom permission sets and their assignments to permission set groups. Take advantage of this new capability by establishing a custom report type with “Permission Set Assignment” as the primary object. This enables you to create reports on custom permission set assignments and their inclusion in permission set groups.

Feature 5

6. See What’s Enabled in a Permission Set More Easily (Beta)

Now you can view what permissions are enabled by using the View Summary button on any permission set, which provides you with a holistic view of all permissions.

Feature 6

7. See How Many Permission Set Groups a Permission Set Is Added To

Salesforce has a view of how many permission set groups a permission has been added to.

Feature 7

8. See API names for the Object and Field Permissions in Permission Sets

Salesforce makes it easy for admins to view the field API Name within the permission set as a column.

Feature 8

9. Create Custom Error Messages in Record-Triggered Flows

Salesforce introduced the customization of error messages for record-triggered flows.

Custom Error Feature 9

10. Layout User Interface Update

Flow’s user interface has gotten better than expected. Now, when you click on an element, the screen will open up on the side rather than a pop-up.

Feature 10

Conclusion:

As we wrap up our journey through Salesforce Winter ’24, it’s abundantly clear that Salesforce remains committed to pushing the boundaries of CRM innovation. With these new features and enhancements designed to improve customer experiences, boost productivity, and help businesses thrive, this winter release is a testament to Salesforce’s dedication to its users.

So, bundle up, get ready to explore, and let Salesforce Winter ’24 be your guide on this journey of business transformation. The possibilities are endless, and the future is bright with Salesforce by your side.