

Sharing plays a crucial role in salesforce. Ever wonder if you can share the record with users based on the data in a lookup field. Well, your wish has come true – the flow now allows you to do this without writing a single line of code. Let’s look at this in details with an use case,
Let’s look at a Universal Container use case:
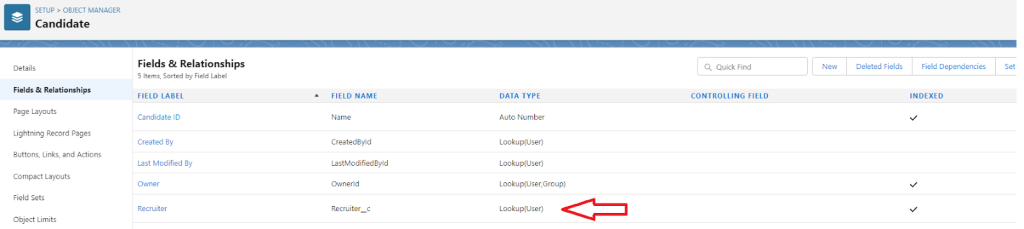
John is a system administrator and is working at the Universal Container (UC) and managing the recruiters. The user would like to see and edit only the candidates that are associated to the recruiters. For this, he already have a custom object called Candidate’.Once the ‘Recruiter__c(Lookup to User object) field gets populated, auto-share the Candidate record (Grant edit access) with the Recruiter.
Associated Procedures:
There are 3 steps to solve John’s business requirement using After-save Record-Triggered Flow. We must:
- Create a custom object with fields
- Create apex sharing reason
- Salesforce flow
- Define flow properties for record-triggered flow
- Create a record variable (varR_RecuritShare) to store Recurit__Share
- Add a decision element to check if ‘Recruiter__cis populated or not
- Add an assignment element to populate record variable (varR_‘RecruiterShare)
- Add a create records element to share the Candidate record with the Recruiter
Step 1: Create Custom Object – Candidate
- Click Setup.
- In the Object Manager, click Create | Custom Object.
- Now create a custom object Candidate and fields as shown in the screenshot below:
- Click Save.
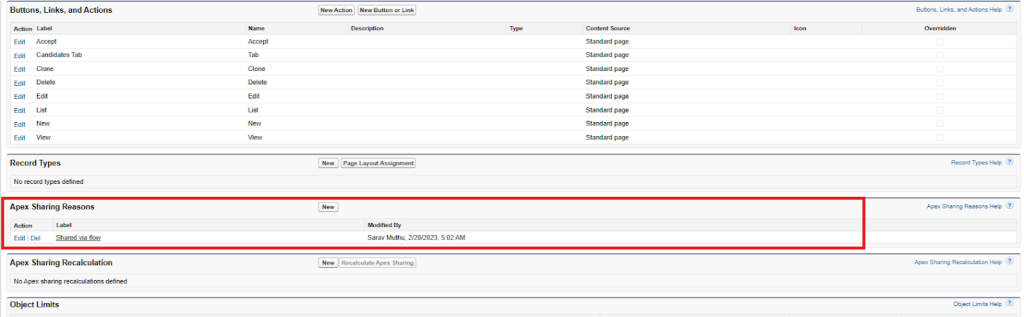
Step 2: Create Apex Sharing Reason
Then we will create an Apex Sharing Reason. Each Apex sharing reason has a Label and a Name. The Label value is displayed in the Reason column when viewing the sharing for a record in the user interface. This allows users and administrators to understand the source of the sharing.
- Click Setup.
- In the Object Manager, type Candidate.
- Select Apex Sharing Reasons, then click New.
- Enter Reason Label and press the Tab key the Reason Name will populate.
- Click Save.
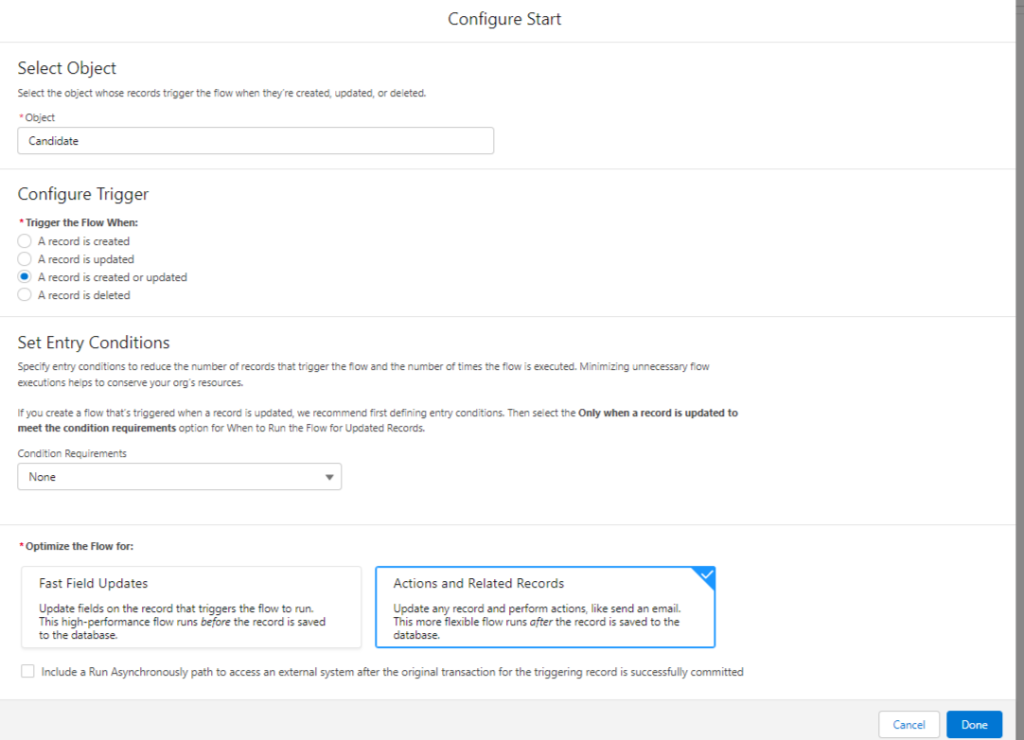
Step 3.1: Salesforce Flow – Define Flow Properties
- Click Setup.
- In the Quick Find box, type Flows.
- Select Flows then click on the New Flow.
- Select the Record-Triggered Flow option and click on Next and configure the flow as follows:
- How do you want to start building: Freeform
- Object: Candidate
- Trigger the Flow When: A record is created or updated
- Set Entry Criteria
- Condition Requirements: None
- Optimize the Flow For: Action and Related Records
- Click Done.
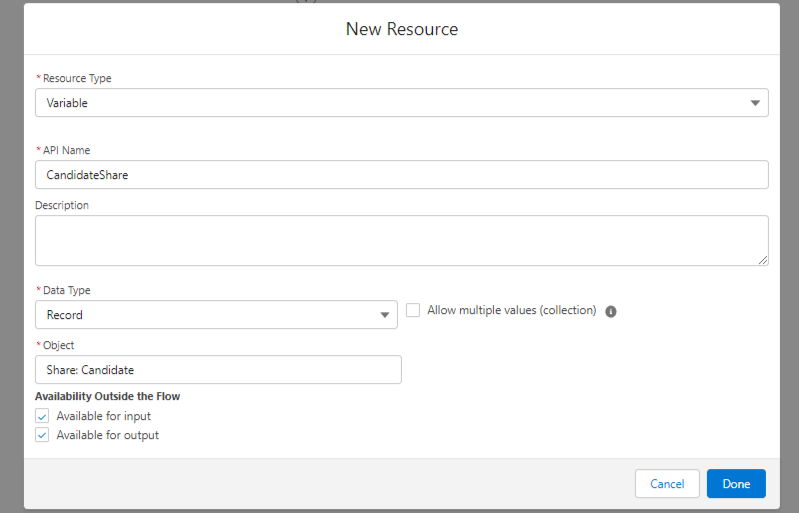
Step 3.2: Salesforce Flow – Create a Record Variable to Store Candaiate__Share
- Under Toolbox, select Manager, then click New Resource to store the Candaidate__Share mapping detail.
- Input the following information:
- Resource Type: Variable
- API Name: CandidateShare
- Data Type: Record
- Object: Share: Candidate
- Check Available for Input
- Check Available for Output
- Click Done
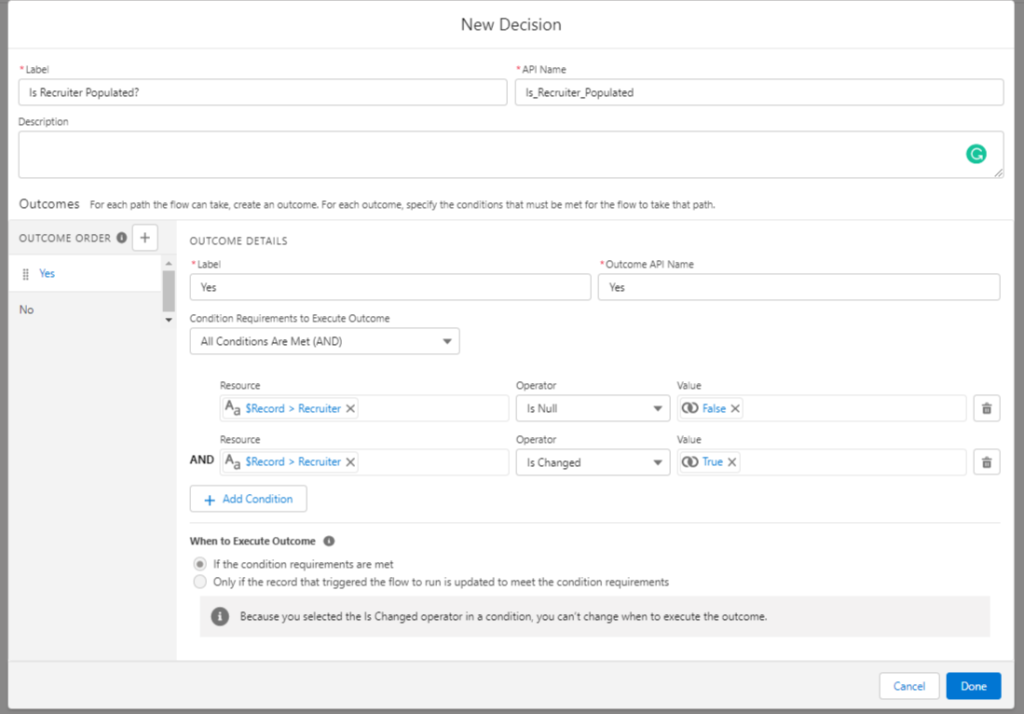
Step 3.3: Salesforce Flow – Using Decision Element to Check if Recuriter field Is Populated or Not
Now we will use the Decision element to check the Candaidte__c from Candidate object to find if it is populated by user or not.
- Under Toolbox, select Element.
- Drag-and-drop Decision element onto the Flow designer.
- Enter a name in the Label field; the API Name will auto-populate.
- Under Outcome Details, enter the Label the API Name will auto-populate.
- Condition Requirements to Execute Outcome: All Conditions Are Met (AND)
- Row 1:
- Resource: {!$Record.Recuruiter__c}
- Operator: Is Null
- Value: {!$GlobalConstant.False}
- Add Field
- Row 2:
- Resource: {!$Record.Recuruiter__c}
- Operator: Is Changed
- Value: {!$GlobalConstant.True
- Row 1:
- Click Done.
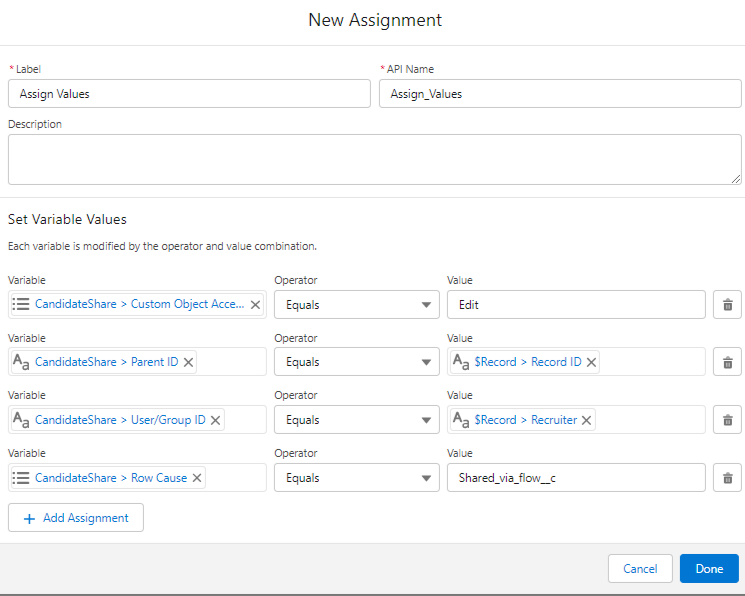
Step 3.4: Adding an Assignment Element to Populate Candidate__Share Record Variable
The next step is to populate the record variable Candidate__share to share the Candidate record with Candidates.
- Under Toolbox, select Assignment. Drag and drop Assignment onto the canvas.
- Input the following information:
- Enter Label the API Name will auto-populate.
- Row 1:
- Field: {!CandidateShare.AccessLevel}
- Operator: Equals
- Value: Edit
- Click Add Row
- Row 2:
- Field: {!CandidateShare.ParentId}
- Operator: Equals
- Value: {!$Record.Id}
- Click Add Row
- Row 3:
- Field: {!CandidateShare.UserOrGroupId}
- Operator: Equals
- Value: {!$Record.Candidate__c}
- Click Add Row
- Row 4:
- Field: {!CandidateShare.RowCause}
- Operator: Equals
- Value: Shared_via_flow__c
- Click Done.
Step 3.5: Adding a Create Records Element to Share the Candidate Record with Recuriter
- Under Toolbox, select Element.
- Drag-and-drop the Create Records element onto the Flow designer.
- Enter a name in the Label field- the API Name will auto-populate.
- For How Many Records to Create select One.
- Map Record Collection: {!CandidateShare}
- Click Done.
Finally the flow will look like this in the below screenshot.