Sweet Potato

Categories
Technical

Workflow To Flow Migration – Salesforce Tool

Introduction

As salesforce admins, you might have used various process automation tools such as workflows, process builders, and flows. There are often questions around what automation tools to use when we come across some requirements.

Salesforce might end all these debates as they standardize everything to flow. They will also help us – ‘Migrate to Flow’. This is a tool released in Spring ‘22 which will help us move across our existing workflows & process builders to Flow.

Steps to migrate to Flow?

1)  Using the Migrate to flow (Beta) option you can automatically Migrate your Workflow Rules to Flows. As an aside,  be aware that Salesforce plans to retire the workflow rules, and they recommend us to build any new requirements using flows. Anyway, you can migrate the existing workflow rules that contain the following items using the migrate to flow tool:

           i) Field updates

          ii) Email alerts

         iii) Outbound messages

         iv) Time-dependent workflow actions

          v) Rule criteria formula that’s set to true(unless evaluation criteria are also set to create, and any time it’s edited to subsequently meet criteria)

All workflow Rules - sweet Potato tec

2)  To test this, click Setup→ Migrate To Flow (Beta). The Migrate To Flow tool shows you all the workflows available in your org. 

Migtate to Flow - workflow to Migration

3)  Select a workflow and click on migrate to flow button. It just one click and your workflow converted into a new flow

Migtation Details - Test the flow salesforce

4)  Now click on the Switch Activation button. Voila! Your workflow rule will be deactivated, and your flow will be activated.

Watch outs

As we know, flows are now flawless, and we hit Apex CPU Limits when a lot of flows are running at the same time. As a refresher, please look at the link below for limits on flows.

https://help.salesforce.com/s/articleView?id=sf.flow_considerations_limit.htm&type=5

Next Steps

As a salesforce administrator, you should spend time analyzing the existing automation you have and then plan to move across as a single flow per object. Create a plan for migration and start small with an object which is less risky and doesn’t impact the business operations massively.

Categories
Technical

Salesforce- Google Ads integration

Customer Requirement 

The client is a UK-based company that manages digital marketing for its customers in both Salesforce and another database. The digital marketing teams were manually entering the same details from Salesforce into their database wizard, which in turn activates the campaign in Google Ads and Bing Ads. The database wizard had an optimization engine that ensured it secures the right price in platforms such as Google Ads. Salesforce is the platform used by their sales team to close their deals.

This makes the sales team do the work double the time. i.e., creating campaigns in their database using their database wizard and then copying and pasting the same data in the salesforce database to store the data and then process it further.

Although the problem may look like an operational efficiency issue, there were several downstream impacts such as delays to Customer Google Ad campaign start dates, incorrect data entry issues which impacted campaign effectiveness. However, in their current state, they can easily insert the data into their Marketing database and optimize the campaign as needed in their database wizard.

Solution Delivered

Sweet Potato Tec developed an API to integrate Salesforce and Database Wizard, keeping in mind the ultimate goal of activating the campaigns in Google and Bing. The integration between Salesforce and their database was seamless and required no manual inputs. It also reduced the errors which caused issues in the customer campaigns as well.

The solution used Lightning components in Salesforce to automate the data entry process which resulted in a lot of time being saved from entering standard data. We utilized the API endpoints provided by the database wizard to send Google Ad Campaign Data.

If you would like to know more about this integration, and please contact us using the button below.


Contact Now

Categories
Technical

LEAD(RN)ING Without A Title

Let’s assume that you’re a safe pair of hands and get things done. Let’s assume that you don’t really worry about who gets the credit as long as the outcome is achieved. Finally, let’s assume that you know what your strengths and blind spots are and you’re not afraid to ask for help when needed. These are big assumptions that involve many other factors, including but not limited to the following: confidence in your ability, emotional intelligence, trust in your peers/managers, and a diverse team. For this blog’s sake, let’s say those factors are all true, and you have been entrusted with a large piece of work.

A large piece of work can be something along the lines of a big project, a program, a portfolio, or a P&L. From my perspective, such divisions are illusory so long as the strategic outcomes are clear. Anyway, you take on this work – as a freelancer or as a third-party consultant- which means you don’t have the title or positional power, but let’s say it makes it up financially. In the current corporate world, you start off on the back foot without a proper title, but hey, if it’s easy it ain’t fun, plus you’re getting a little bit more money.

But here’s the challenge which some of you might have faced…

        1. People whom you need to get the work done with won’t prioritise you, because you don’t have positional power.
        2. You can’t deliver on time because people don’t prioritise you.
        3. People who trusted you before don’t prioritise you either, because you haven’t yet delivered.

I am sure some of you have experienced this at some stage in your career. You possibly also thought that you should have declined the role without a proper job title, but you accepted it anyway because you thought the learnings and the value you could add from this opportunity will outweigh the lack of proper title. Guess what – most of the time you were right in accepting the role, but that doesn’t mean that it’s all going to be perfect right from the word go.

In my view, you just have to stick to the basics and that will take you a long way in adding value. I have listed the basics which I do.

– Show up every day in the right forums

– Identify the people with the right skills and right attitude

– Speak to them on a regular basis and LEARN from them

– Listen to them sincerely and read between the lines

– Distill ideas from those discussions

– Integrate ideas every second of your working day

– Find your biggest critique and run the integrated idea past them

If you do this day in and day out in the area you were hired, people will gain trust and give you more valuable projects. These projects in turn can be used to positively influence your team to work with you.

Now although these things may sound elementary, I think most of the current and previous leaders and C suite execs have achieved their successes by applying similar steps. Let me know if you have any other ideas or tips that you find helpful in leading/learning without a title.

Categories
Technical

How To Implement Omni Channel In Salesforce???

What Is Omni Channel? 

Omni Channel is a tool to manage the priority of work items without writing a code. It’s a flexible, customizable feature.Omni-Channel routes work requests to the most available and qualified support agents in the console.

Where Can This Be Used?

This can be used by people of teams who are managing,

      • Customer Support.
      • Call Centers
      • Patient Appointment etc.,
Steps To Implement Omni Channel:
Enable Omni-Channel
Create Service Channels
      1. Create Routing Configurations
      2. Configure Presence Configurations
      3. Create a Presence Status
      4. Create Decline Status
      5. Create Queues & Assign Queues to Routing Configurations
      6. Provide access to Presence Status
      7. Add Omni Channel to Console
      8. Test the Setup
1.Enable Omni-Channel

This step is simple – Goto Setup→Omni-Channel Settings→Enable Omni-Channel


2.Create Service Channels

Service Channels: Service channels let you turn nearly any Salesforce object―such as a case, lead, SOS session, or even a custom object―into a work record.

Goto Setup→Omni-Channel Settings→Service Channels and click ‘New’. I have provided the name ‘Omni Channel Omni Setup Flow Cases.


3.Create Routing Configurations

Routing Configurations: Routing configurations determine how work items are routed to agents. Use them to prioritize the relative importance and size of work items from your queues. That way, the most important work items are handled accordingly, and work is evenly distributed to your agents.

Goto Setup→Omni-Channel Settings→Routing Configurations and click ‘New’. I have provided the name High Priority Cases and should be routed to the Agent who is Most Available..


4.Configure Presence Configurations

Presence Configuration: Presence configurations determine how much work agents can take on and the Omni-Channel behaviors while they assist customers. In each configuration, defining how to handle work requests, I have selected the capacity for an agent as 1.

Goto Setup→Omni-Channel Settings→Presence Configurations and click ‘New’ to create the configuration.


5.Create A Presence Status 

Presence Status: It helps you track information about your agents’ availability.

Goto Setup→Omni-Channel Settings→Presence Status and click ‘New’ to create the agent status.


6.Create Decline Status

Presence Decline Status: This helps to track when any of the work is declined by the agents they can send this reason.

Goto Setup→Omni-Channel Settings→Presence Decline Reasons and click ‘New’ to create the reasons


7.Create Queues & Assign Queues To Routing Configurations

Goto Setup→Queues and Click New to create the Queue and assign it to the Routing Configuration.


8.Provide Access To Presence Status

Goto Setup→Profile→ Enabled Service Presence Status Access and add the status.


9.Add Omni Channel To Console

Goto Setup -> App -> App Manager.Click Service Console app and Add Omni Channel using “Add Utility Item”.


10.Test The Setup

In Service Consoles, there is a Utility Bar item for Omni-Channel. This is where agents log on to Omni-Channel and show themselves as available for work. This is also where new incoming work will display for agents to grab.


When any new case is created and if it’s assigned to the queue then they will get an audio notification and the work will appear in their Omni-Channel window


Categories
Technical

 Salesforce Web To Lead Or Any Thing Using Form Assembly

Fascinating the visitors to your websites is an important part of digital marketing. A well-designed form taking information about visitors and interest in your services can bring a lot of revenue to your business.

If you are worrying or not knowing about HTML or CSS to build a lead form – don’t you worry! This blog will help you to create simple but attractive forms without writing a single line of code. Let’s introduce you to FormAssembly.

What Is FormAssembly For Salesforce?

It’s a paid enterprise cloud form creation and data collection form which creates rich and engaging forms with form builders.

Why FormAssembly?
  • Easy to use and easy to integrate with salesforce.
  • Capturing more data like notes and attachments.
  • Point and click.
  • No code.
  • Easy to customize your form.
  • Accept payments via stripe or pay pal.
Steps To Capturing Lead:

1)Build:

i) Login to the FormAssembly (You can use 14 days free trial).

ii) Click the build option from the left pane and click the blank form if you want to create a form from scratch.

iii)Then drag and drop the columns from the “Add Content “ option you need for the form.

iv) After the customization, your form will look like this below.

2)Connect:

After building the form you have to connect it with salesforce. Click the connector option from the left pane. select the salesforce option to connect the form with salesforce and define which fields we have to map.

3)Publish:

Click the “Publishing” option. Then download the HTML code and paste it into your website wherever you want.

Finally, your form is ready to use. Just fill the form and click the submit button. Voila – your lead will appear in your salesforce org.

Categories
Technical

Auto Attach The Lead To The Campaign In Salesforce

Hello, my name is Jothi, I’m a Salesforce Consultant here at SPT

As a consultant, I have worked on many projects and provided solutions to our clients and I’m here to share my learnings from one of my recent works.

Custom metadata type:

Custom metadata type in salesforce is customizable, deployable, packageable, and upgradeable application metadata. First, you create a custom metadata type, which defines the form of the application metadata. Then you build reusable functionality that determines the behavior based on metadata of that type. 

In simple words, we can use CMDTs to store master data records that can be used throughout an organization. Some common use cases I have seen are storing organization-wide VAT or tax calculations. In the case of tax calculations, relationships between country and state are created to store individual tax rates. Apex code or formula fields can access the metadata records to perform the calculations.

Custom metadata type is used to store information that can be accessed from Formula field, Apex code, Process builder, etc. Though custom metadata type is similar to custom objects, it performs better than custom objects because it is available in the cache. Another difference you can notice between the custom metadata type and custom object is the suffix. Custom metadata type has __mdt suffix at the end while the custom object has __c at the end.

Business Use case:

Let us start with a business use case, one of our clients provided us a requirement to automatically attach the leads created in Salesforce to the appropriate campaign using a picklist value as criteria, this automation should work for any lead that is created on their org whether it may be created manually or it may be received from the web, etc.

The client provided us with the list of picklist values and their respective campaign IDs to which the lead should attach automatically.

Solution:

In this case, the first thing that came into my mind was process builder as our client mentioned that they don’t want us to create code.

We can create a process builder with the picklist values as criteria, for each value we have a campaign Id to which the lead wants to get attached.

But hang on…Is it a best practice to add a set of hardcoded id values in the process builder?

The answer is – No, it is not a best practice to hard code ids in the formula, validation rules, Apex code, processes, flows, and so on.

Alternate to hardcode:

Rather than using the Ids in the process builder, we need something else to store the ids. we can use the same configuration tools that developers use in code — such as custom metadata types (CMDTs), custom labels, and custom settings — to store Salesforce IDs

From the above suggestion, my choice is “Custom Metadata Type“.

First, we can create a custom metadata type that stores the picklist values and their associated campaign ids, and then we can create a process that can fetch the data from the custom metadata type. Similar to a custom object or custom setting, a CMDT has a list of custom fields that represent aspects of the metadata.

I have performed the following steps to solve this requirement:

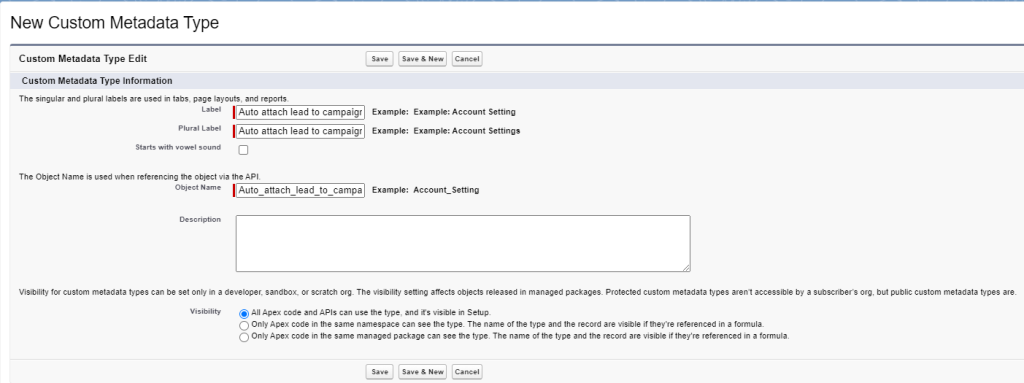
1. To create a new custom metadata type, navigate to Setup | Custom Metadata Types and click on the New Custom Metadata Type button. Now fill the form as mentioned in the following screenshot:

New Custom Metadata Type

2. Click on the Save button.

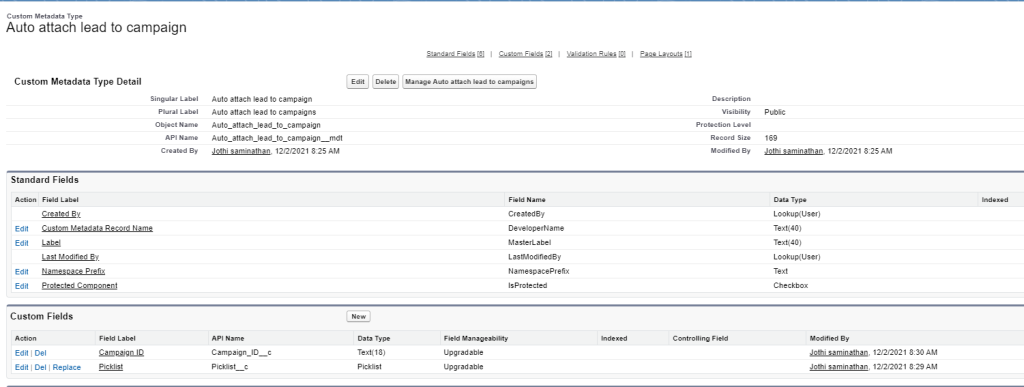
3. Create custom fields for the CMDT. In this example, we’re creating one picklist field and one text field for Id.

 Once done, click Manage to create the data records for the CMDT.

Auto Attach lead to Campaign

We can use it for all the things you want to use CMDT first over a custom label or custom setting. CMDT data records are metadata type, which means it does not get deleted with sandbox refreshes or new sandboxes. You can deploy the data using CMDT in change set.

Now add this in process builder, To create a process builder navigate to Setup | Process Builder Click the New button

1. Enter the process name and A Process starts with “A record changes”

2. Select the object “LEAD” and criteria as “Only when a record is created”

3. Click Criteria then enter the name for criteria and select “conditions are met” for executing actions.

4. Now in conditions, select the picklist field and the first value and click save.

5. In Immediate action, click add action and Select the action to be performed as Create a Record.

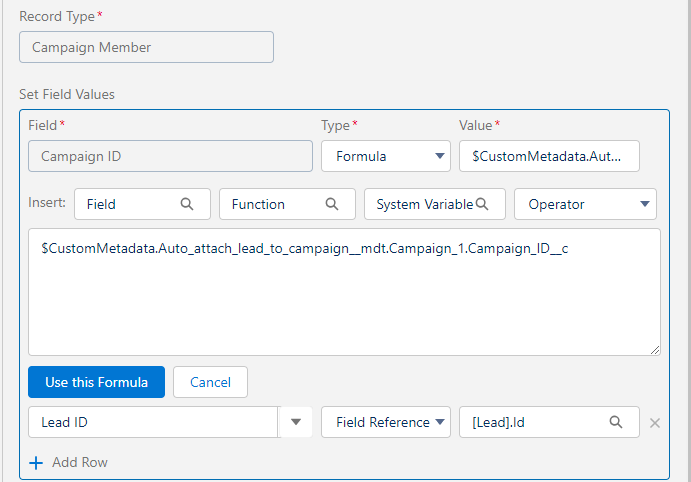
6. Enter the name for action and select the record type as “Campaign Member” because a lead or a contact attached to the campaign is a campaign member.

 7. In Set Field Values, For the campaign Id create a formula like below

8. Click Save.

9. Repeat these steps for all the picklist values.

Deploying the CMDT

We can deploy using a change set, you’ll find the CMDT name listed alphabetically in the component list. When you select the CMDT name, you’ll find the data records. From there, click

View/Add Dependencies. This will identify the CMDT itself. You can select to add all of those components to your change set.

Categories
Technical

Docusign Salesforce Integration – Automate Your Contract Process

  • Are you tired of signing contracts in paper form and can’t keep track of where we stored the pdf?
  • Well, you’re in the right place, here is a quick blog that explains how DocuSign e-signature works with Salesforce.
  • Let’s keep it simple6 key steps are involved to get the contract signed.

Watch this video where Sarav walks through the process. If you would like to download the steps as a pdf, Click here